Tools
Information
Contacting Us
- - Xero- Business Central- QuickBooks Online
Product
About Us
On-boarding Checklist
Any successful setup of Zahara requires data to either be synced or imported into Zahara. The guide below is designed to help you understand what's required and what data needs to be provided.
Integration Type
Click the finance system you use?


Data Sets
The datasets we require to setup each Business in Zahara are as follows:
- Users
- Suppliers
- Nominal Codes
- Tax Codes
- Cost Codes (Optional)
- Projects (Optional)
Importing Data
All of the above datasets can be imported into Zahara using the interface. Just prepare a spreadsheet in the correct format and import for a quick and easy setup.Users
For users, we need First Name, Last Name & Email Address. These can be sent in a spreadsheet. See the section below on user membership and structure.
Suppliers
If you are using a sync finance system (Xero, MYOB, QuickBooks) or have opted for SmartSync, your suppliers will sync directly and you don't need to take any action on this. Otherwise we will require a CSV or Excel spreadsheet with at least Supplier Name, Account Code (Short supplier name). However the more information you provide us the more we can map to corresponding fields in Zahara.
Nominal Codes
Same as suppliers in terms of sync but if you are supplying a CSV file we need the code and the description.
Tax Codes
Again sync if we can otherwise a CSV file with Tax Code, Tax Rate and description.
Cost Codes
These are our optional select lists for line items. You can use them in any way you like. Xero users can map them against one tracking category. Sage users might want to use them as a department code if they don't use Projects and Cost Codes. Again, if we can sync them we will otherwise provide a CSV file with Code and Description.
Projects
Projects should be used as projects if possible and can be synced with a Xero tracking category or a Sage Project. The key fields we need here are Project Code, Project Name, Description, Start Date and End Date.
Structure
For every Business / Company you wish to have setup, we need the structure in terms of departments and people. A Business Unit in Zahara will map to a Company / entity in your finance system and are ring-fenced. For every Business we need to know:
- Division Names (Departments)
- User membership for the Division
- Division Head (manager)
- Approval workflows for Purchases
- Approval workflows for Invoices
For every business we are setting up we need the key datasets above with the users sitting across all the Businesses.
Divisions
Divisions are the natural groupings of people inside the organisation. You can use these as departments, sites or locations. Once the Division is created - as an example, "Sales", we assign the users we have already created, and then create the workflows.
User Membership
On a spreadsheet just list the Division and the users. Each user can have one of five roles - Finance, Admin, Receiver, Buyer & Approver. Please state their roles on the spreadsheet. We can fine tune permissions later. A user can belong to more than one Division.
Division Head
For each of the Divisions, if there is a manager or head, flag this so we can use that variable in Approval workflows.
Approval Workflows
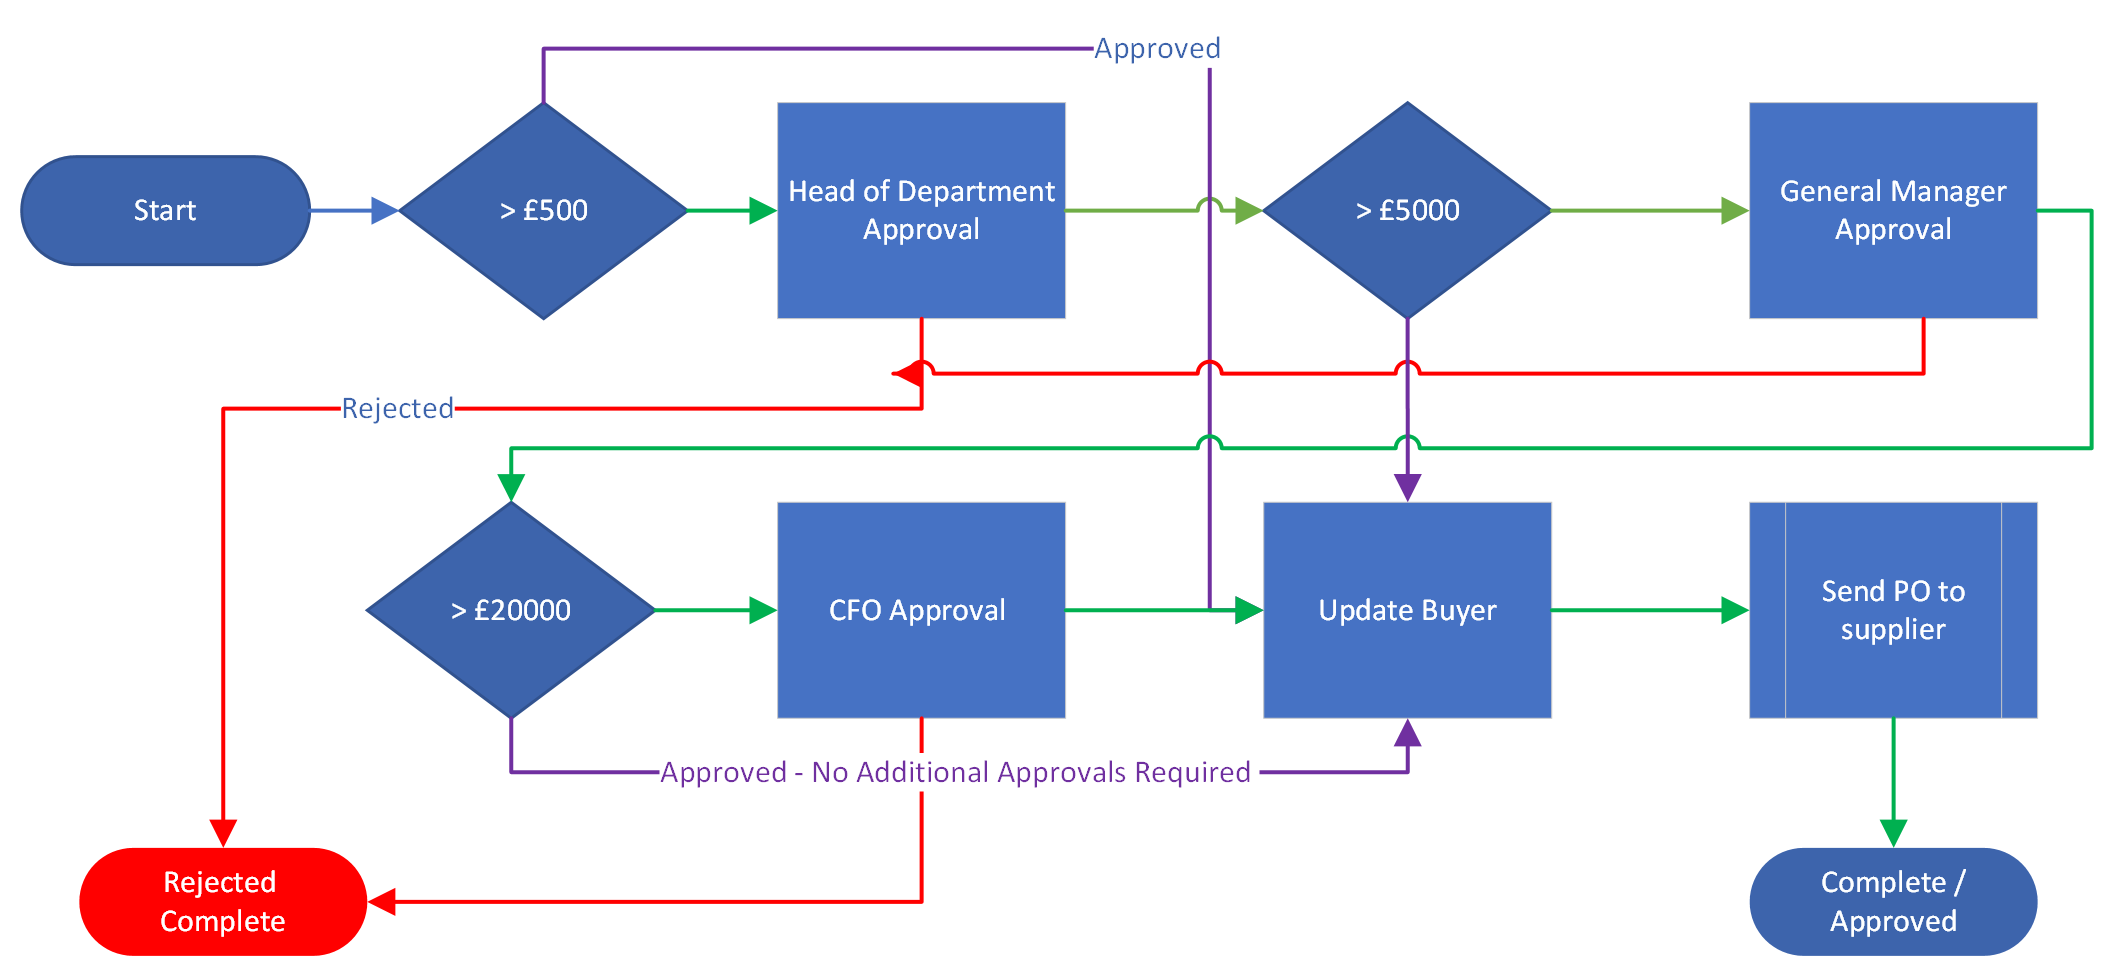
Approval workflows are created in Divisions and if we have our structure correct and our users created, we can create approval workflows for both purchases and invoices. How you get the requirements to us is up to you. We can work with a flow chart diagram or set of rules. Have a look at the diagram below to understand how workflows work.
In this example, we have 3 approvers involved. The HOD will only be asked to approve if the price of the order is over £500. The GM will be asked to approve if its over £5000 and the CFO when it's over £20000. Any one of them can reject and cancel the order. The workflow will jump to update the buyer if the approver isn't required to approve, and the previous approval step was positive. This is a typical approval workflow for Purchase Orders.
Approval Workflows for Orders
A typical order workflow will cover approvals, notifications and sending a purchase order. Wherever possible we will want to create one workflow and then distribute this across all Divisions changing the people involved. You can supply a matrix to us with the rules. A typical workflow will have 3 conditional approval steps, a step to email the buyer to say the order has been approved and a step to send the purchase order to the supplier. Our advice is to keep it simple. Don't agonise and over-engineer. Something will be better than nothing and will help you to save money faster.
Invoice Approval
The main thing to think about here is what conditions will push an invoice out for approval. Non PO invoices will be handled differently to PO invoices. What price threshold do you want for an order invoice to require approval. The outcome for an invoice approval should be to export the invoice to the finance system. If you have a sync finance system this can be an automated step, otherwise you will need an output file.
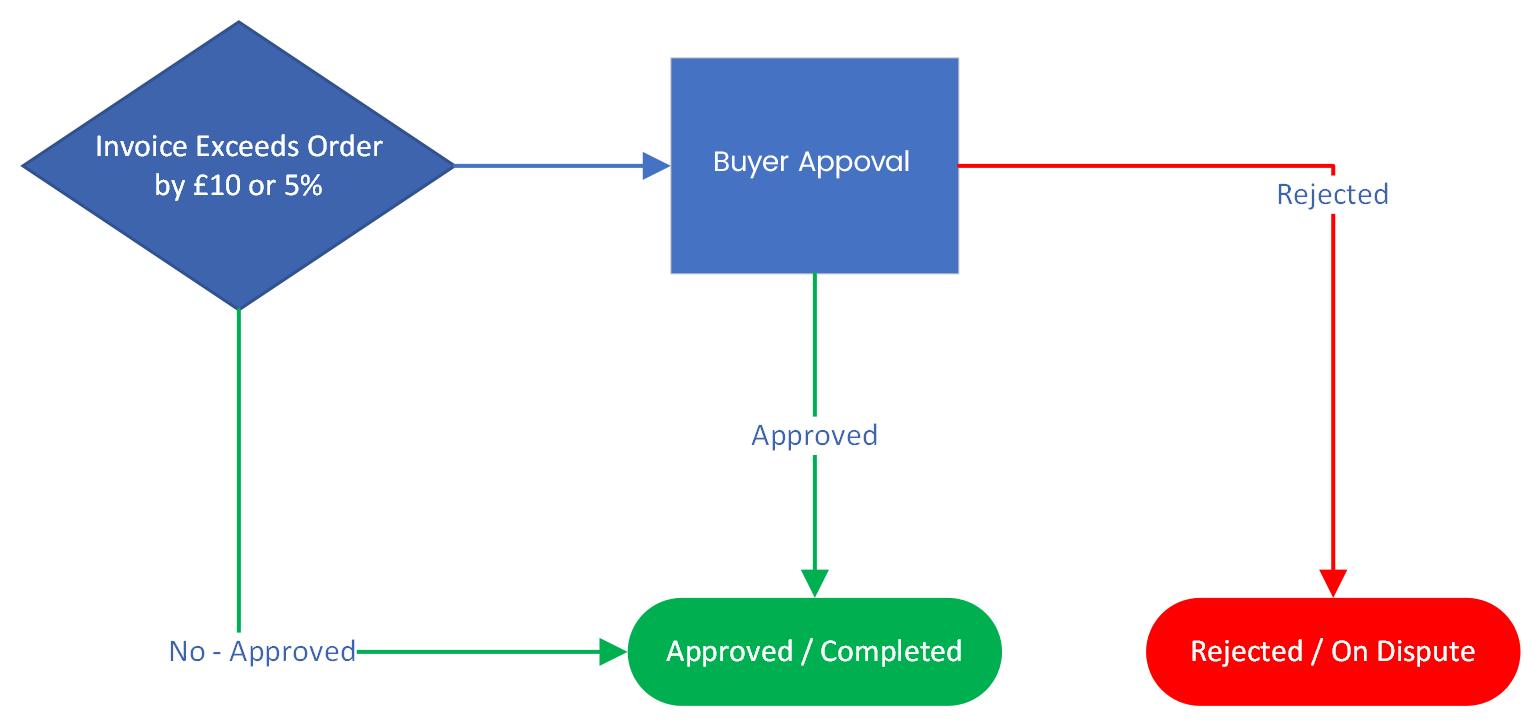
In this example, for invoices that are linked to an order, we are testing a condition to see if the Invoice exceeds the order by more than £10 or 5%. If this is true then we will ask the buyer to approve the invoice.
An invoice that is standalone - example, a utility bill, will typically follow the same approval workflow as an order.
Budgets
If you are rolling budgets from the start we will need to import budget data. Budgets can be assigned to either a department or a project. The key data we need is:
- Budget Name
- Budget basis - Nominal Codes, Cost Codes or Absolute amount
- Budget period - Year, Ongoing (Project), Monthly, Quarterly
- Budget amount - usually code, period, amount
- Budget carry forward - do we enable over or underspend to be carried into the next period?
- Budget assignment - what is this budget being assigned to - Department or Project
Budget Setup
Budgets aren't difficult to setup but do require the right information to be provided to us. We would recommend Budgets are setup towards the end of on-boarding once we have all the other data in place.
SmartSync (Sage 50 / 200)
SmartSync is our on-premise tool that allows us to connect to Sage 50 & 200 and is also the tool used to get data up and down from legacy or on-premise systems.
If you will be using SmartSync for Sage 50 (or Sage 200) we will want to install it at the start of process so we can pull in the datasets. The procedure is as follows:
- Create us a dedicated username and password for Sage
- Schedule a time with our support team - allow 1 hour
- Get unrestricted access to the PC or server that SmartSync will be installed on.
- Facilitate the remote access call - run Team Viewer ahead of the call
- Allow the Zahara colleague to sync your data into Zahara
Company Mappings
Each company in Sage will be mapped to a separate business unit in Zahara. This means a separate profile will be created in SmartSync. Wherever possible we will clone profiles to speed up the setup. Syncs of the key data can be set to daily yet invoice polling can be every 10 minutes during working hours.
Sage Drive
Zahara's SmartSync won't work with Sage Drive. There will be one too many syncs so we insist that Sage data is stable on your server / network.
Sage Data
Our advice is to install SmartSync onto a server as close to the Sage data as possible. The Zahara owner should have access to this server for maintaining SmartSync as it may require resetting from time to time.
Useful Help Guides
Pegaus Opera
SmartSync is our on-premise tool that allows us to connect to Opera and is also the tool used to get data up and down from legacy or on-premise systems.
If you will be using SmartSync for Opera we will want to install it at the start of process so we can pull in the datasets. The procedure is as follows:
- Liaise with our Opera partner specialists
- Schedule a time with them to install Smartsync and their connector
- Get unrestricted access to the PC or server that SmartSync will be installed on.
- Facilitate the remote access call - run Team Viewer ahead of the call
- Allow the Zahara partner to sync your data into Zahara
ERP / On-premise
SmartSync is our on-premise tool that allows us to get data up and down from legacy or on-premise systems.
If you will be using SmartSync with your finance system, we will want to install it at the start of process, so we can pull in the datasets. The procedure is as follows:
- Schedule a time with us to install Smartsync
- Get unrestricted access to the PC or server that SmartSync will be installed on.
- Facilitate the remote access call - run Team Viewer ahead of the call
- Allow the Zahara partner to sync your data into Zahara
- Run tests on the schedules and make sure data is flowing correctly
Automatic Exporting of Invoices
Using an integrated finance system, invoices can be automatically exported into Zahara as part of an invoice workflow. Usually you would add some approval steps with conditions followed by an export invoice step. This then supports full automation. Invoices can always be manually set for export. Approved users can select relevant invoices and then click Export. Invoices will then export into your finance system.
Exporting Invoices
Zahara has a range of pre-set invoice export formats. You can select one of these or use our universal export template and choose the fields you wish to export. However, the format for all non-integrated systems is to select invoices and click the export button. A file will be generated and downloaded to the users PC.
You will then need to import this file into your finance system using it's import routine.
On-boarding Procedure
Setting up Zahara isn't complicated or time-consuming. If your finance system syncs with Zahara we will pull in a lot of the data we need. In that scenario, we just need the users and the workflows for each of the entities we are setting up
Our on-boarding team will get to work straight away. A typical project will work like this:
- Schedule a kick-off meeting to understand your expectations. Agree a go-live date
- Setup key information working with data you have supplied
- Schedule a training session to show you the Zahara setup
- You now test Zahara and get familiar with everything
- Schedule any additional training
- Make any changes to setup or required refinements
- Go Live - start using Zahara
- You deliver end user training
- Liaise with our on-boarding team for help and support
- Move over to ticketing support when comfortable
Useful Help Guides


