Business Unit Category
Add an email signature
Coding Restrictions
Create new Business Unit
Custom Fields on Line Items
Customised labels
Date formating
Default delivery address
Division Management
Editing Email Templates
How to hide cost codes
Invoice email forwarding – Microsoft 365
Pros and Cons of Using Zahara’s Inbuilt Email Service vs. Your Own SMTP
SMTP & Email Sending
T&C on your PO Template
Invoice Processing Help Category
Auto reject supplier invoices
Auto rejecting of invoices issue
Finding an order or invoice
How to create a credit note
Invoice email forwarding – Microsoft 365
Invoice export colours
Invoice Inbox
Invoice List View
Invoice matching
Invoice Processing Explained
Month end cut offs
Negative Order Balance
Setting up Autopilot
Supplier Matching
Waiting for a GRN
Purchase Orders Category
Adding a product to an order
Adding documents to an order
Bulk importing orders
Close Orders Automatically
Closing an order
Copy PO to Buyer
Creating a Purchase Order
Deleting a PO
Duplicate Order Prevention
Editing an order
Finding an order or invoice
GRN an Order – Learn with this Guide
Grouped Purchase Orders
Import Line Items
Negative Order Balance
PO Template Editing
Product Centric Buying
Purchase Order Numbering
Purchase Order PDF
Purchase Order Prefix
Purchase Requisition Number
Quick Create a Purchase Order
Send PO to Supplier
Supplier order acceptance
What is a Purchase Order?
Prerequisites
A Sage Intacct administrative account and a Zahara Tenancy Admin user are required to configure this integration.
Zahara connects each of its business units to entities in Sage Intacct. Zahara does not support connections to the ‘Top-Level’ in Sage Intacct.

Ensure that you’ve subscribed to Intacct’s “Web Services” module. It is also recommended that you have the “Taxes” module enabled.
Add Zahara’s Sender ID to the allowed list.
Create the corresponding Entities in Sage Intacct as Business Units of Zahara.
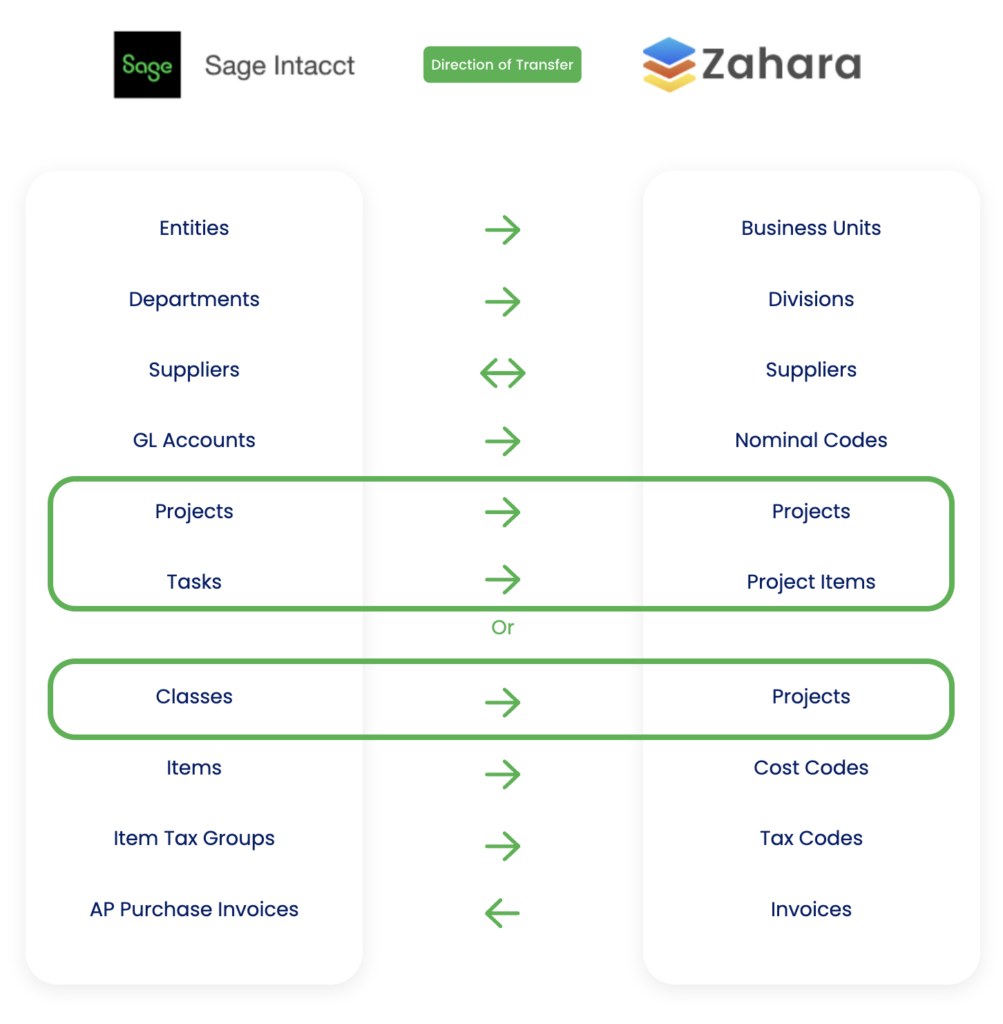
You can link Projects in Zahara with either Sage Intacct’s Project Module or the Cross-Company Dimension of Class.
To check if you are using Sage Intacct’s Project Module, check that the Projects Subscription is enabled in Intacct by heading to:
If you are using Sage Intacct’s Project Module, and wish to bring “Tasks” from Sage Intacct to Zaharas’ Project Item Codes, Project Item Codes must be enabled within each Business Unit.
If you’ve not subscribed to Sage Intacct’s Project Module, you do not need to enable Project Item Codes, and instead can choose to link Sage Intacct’s Cross Company Dimension of “Class”. Instructions on how to make this choice is listed below.
You must configure Zahara’s integration section to link Sage Intacct to Zahara.
Once the synchronisation has been triggered, check the following areas to ensure that your Sage Intacct data now appears:
