


Business Unit Category
Add an email signature
Coding Restrictions
Create new Business Unit
Custom Fields on Line Items
Customised labels
Date formating
Default delivery address
Division Management
Editing Email Templates
How to hide cost codes
Invoice email forwarding – Microsoft 365
Pros and Cons of Using Zahara’s Inbuilt Email Service vs. Your Own SMTP
SMTP & Email Sending
T&C on your PO Template
Invoice Processing Help Category
Auto reject supplier invoices
Auto rejecting of invoices issue
Finding an order or invoice
How to create a credit note
Invoice email forwarding – Microsoft 365
Invoice export colours
Invoice Inbox
Invoice List View
Invoice matching
Invoice Processing Explained
Month end cut offs
Negative Order Balance
Setting up Autopilot
Supplier Matching
Waiting for a GRN
Purchase Orders Category
Adding a product to an order
Adding documents to an order
Bulk importing orders
Close Orders Automatically
Closing an order
Copy PO to Buyer
Creating a Purchase Order
Deleting a PO
Duplicate Order Prevention
Editing an order
Finding an order or invoice
GRN an Order – Learn with this Guide
Grouped Purchase Orders
Import Line Items
Negative Order Balance
PO Template Editing
Product Centric Buying
Purchase Order Numbering
Purchase Order PDF
Purchase Order Prefix
Purchase Requisition Number
Quick Create a Purchase Order
Send PO to Supplier
Supplier order acceptance
What is a Purchase Order?
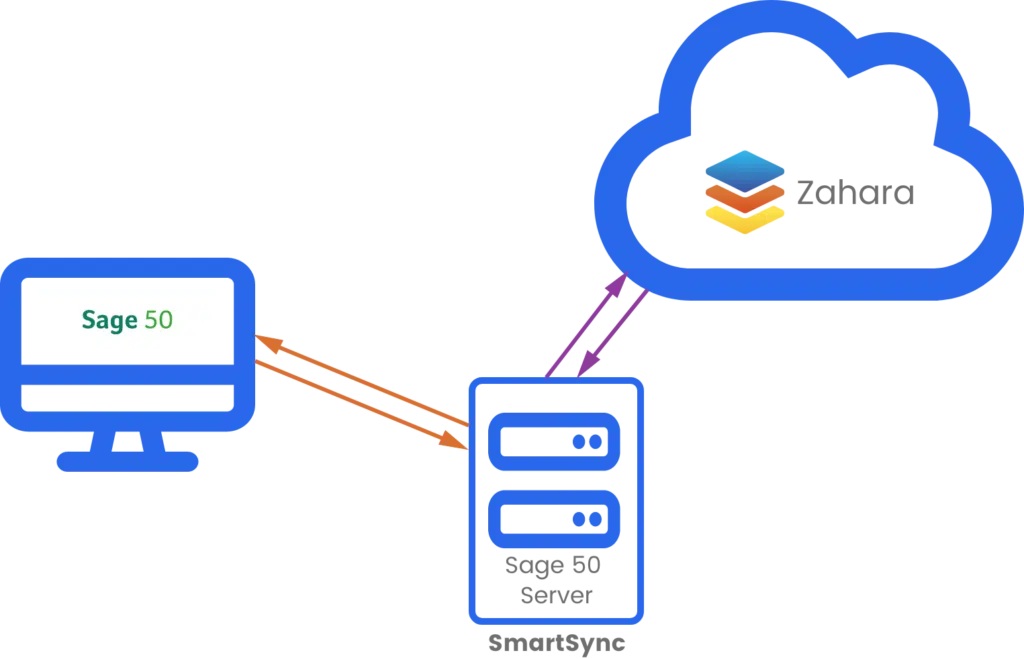
SmartSync is our own in-house developed tool that can sit between Zahara, Sage and locally installed OCR programs, and can pull the nominal (or GL) codes, tax codes and suppliers through to Zahara and allow the posting of invoices raised and approved on Zahara to Sage.
SmartSync will sit on a server (typically the same server on which the client’s Sage is installed) and automatically sync data from Zahara to Sage and vice versa.
The diagram below explains how this works:
Installation Time
When it comes time to get SmartSync booked in, it is best to raise a ticket with our support team and they will send you the most up to date booking link, to allow you to book in at a time that suits best. During the booking process you will need to complete the questions from the support team to ensure the installation process runs as smoothly as possible.
The installation process is simple and best done by our support team, they will remote onto a client’s desktop and install the tool onto the server, they will run an initial sync to bring across the required data from Sage to Zahara and from then on the syncs should run automatically.
Settings
There are a number of configuration settings that need to be set as part of the setup that affects the structure of Zahara. This includes how departments are used and other mappings. It’s important for us to know how to set SmartSync up in advance and it’s preferable to avoid unwinding previous or aborted installations.
If you use Sage Drive – i.e. your Sage files are stored in Sage’s cloud, then unfortunately SmartSync is not compatible. If you would like to take advantage of this more bespoke, automated solution, you will need to revert to local data storage.
