Business Unit Category
Add an email signature
Coding Restrictions
Create new Business Unit
Custom Fields on Line Items
Customised labels
Date formating
Default delivery address
Division Management
Editing Email Templates
How to hide cost codes
Invoice email forwarding – Microsoft 365
Pros and Cons of Using Zahara’s Inbuilt Email Service vs. Your Own SMTP
SMTP & Email Sending
T&C on your PO Template
Invoice Processing Help Category
Auto reject supplier invoices
Auto rejecting of invoices issue
Finding an order or invoice
How to create a credit note
Invoice email forwarding – Microsoft 365
Invoice export colours
Invoice Inbox
Invoice List View
Invoice matching
Invoice Processing Explained
Month end cut offs
Negative Order Balance
Setting up Autopilot
Supplier Matching
Waiting for a GRN
Purchase Orders Category
Adding a product to an order
Adding documents to an order
Bulk importing orders
Close Orders Automatically
Closing an order
Copy PO to Buyer
Creating a Purchase Order
Deleting a PO
Duplicate Order Prevention
Editing an order
Finding an order or invoice
GRN an Order – Learn with this Guide
Grouped Purchase Orders
Import Line Items
Negative Order Balance
PO Template Editing
Product Centric Buying
Purchase Order Numbering
Purchase Order PDF
Purchase Order Prefix
Purchase Requisition Number
Quick Create a Purchase Order
Send PO to Supplier
Supplier order acceptance
What is a Purchase Order?
Creating a large number of users? Using our Import Users feature, you can create a large number of users in Zahara at the same time. This is perfect for initial setup as well as to assist in the expansion of your business in Zahara.
Navigate to the Tenancy Admin page. This can be found by clicking ‘Settings’ under the ‘Admin’ drop down menu in Zahara.
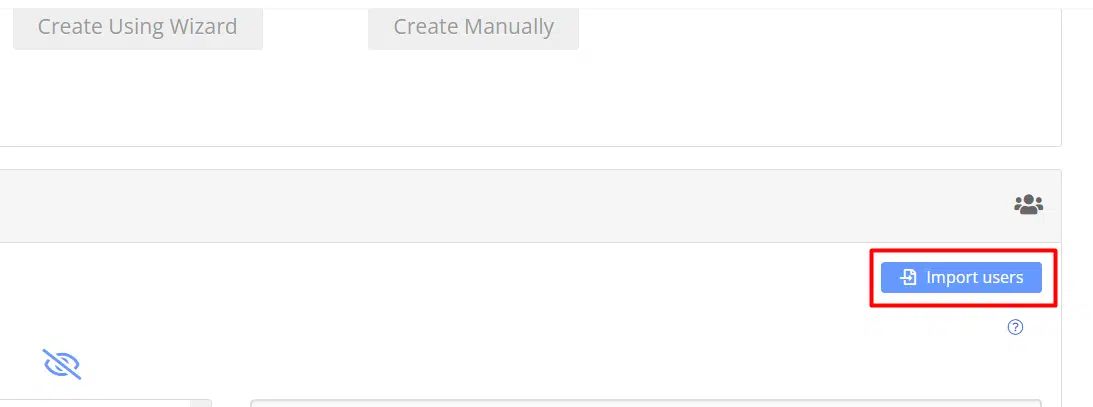
Scroll down to the list of users currently in the tenancy, and press the button on the right side of the panel:
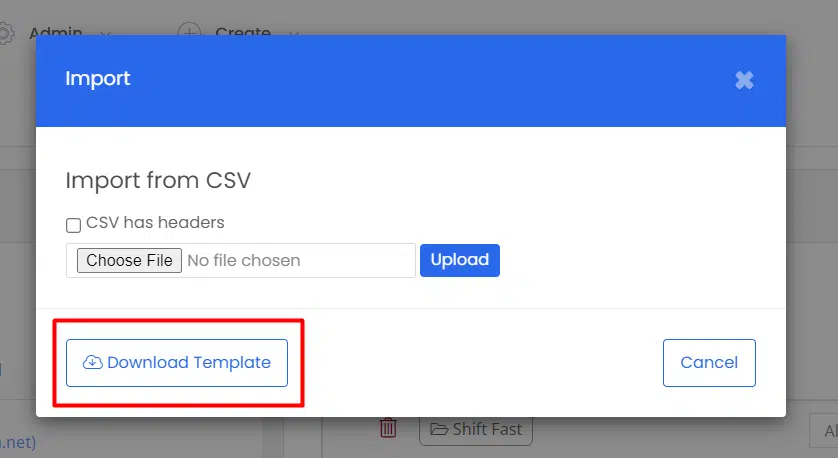
This will create a pop-up box where you can download a template CSV file, and import the document. Click the Download Template button in the bottom left.
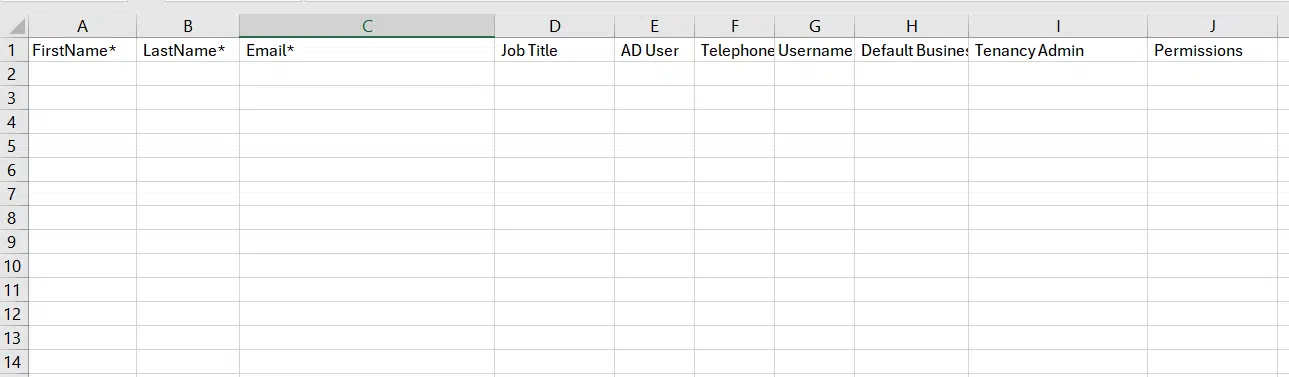
Now you have a copy of the template, you can begin to enter in the users you wish to add. The first three columns are required fields- these must be complete for a successful import.
Ensure the ‘CSV has headers’ box is checked after importing the file to ensure that the document is read correctly.
Below is an example string that shows the formatting for the permissions cell per user.
[BG]CUDV-[BD]CUDV-[BS]CUDV-[BU]CUDV-[CC]CUDV-[DS]CUDV-[IN]CUDV-[NC]CUDV-[PR]CUDV-[P]CUDV-[PJ]CUDV-[PO]CUDV-[R]CUDV-[S]CUDV-[TC]CUDV-[U]CUDV
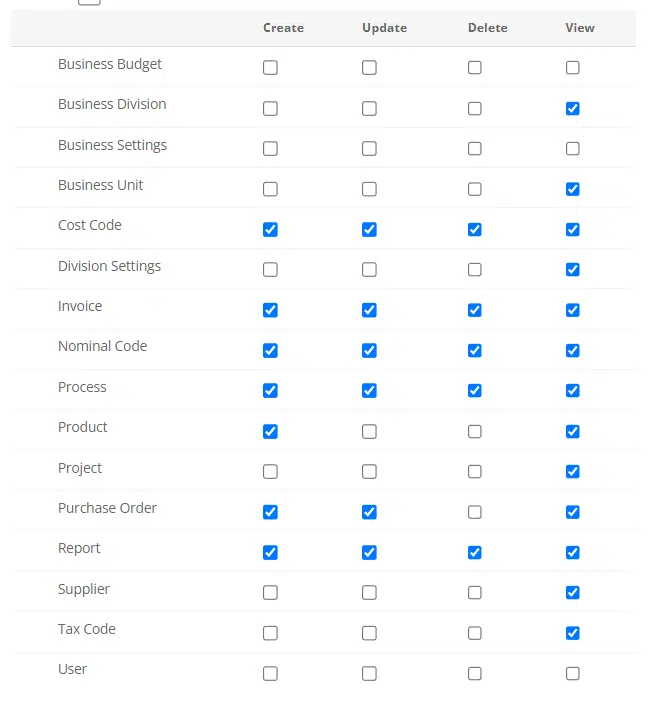
This might seem complicated, but do not worry! It directly refers to this permissions panel for each user:

The above example essentially grants the user every permission. The two letters within the square brackets are the ‘row’ of this table:
Business Budget ([BG]), Business Division ([BD]), Business Settings ([BS]), Business Unit ([BU]) and so on.
The four letters immediately after the code are the vertical columns. The C refers to the Create permission, the U refers to the Update permission, and D and V refer to Delete and View respectively.
For each user, you will need to adjust this format to represent the permissions needed for each user. For example, if I wanted a user to be able to Create, Update, and View, but not Delete, for a row, you would include only the two letter code, followed by ‘CUV’ (e.g [IN]CUV). Each section must be separated by a hyphen.
Below is an example import string for a user with a more complex permission requirement in their business:
[BG]-[BD]V-[BS]-[BU]V-[CC]CUDV-[DS]V-[IN]CUDV-[NC]CUDV-[PR]CUDV-[P]CV-[PJ]V-[PO]CUV-[R]CUDV-[S]V-[TC]V-[U]
When imported, the user permissions will look like this: