


Business Unit Category
Add an email signature
Coding Restrictions
Create new Business Unit
Custom Fields on Line Items
Customised labels
Date formating
Default delivery address
Division Management
Editing Email Templates
How to hide cost codes
Invoice email forwarding – Microsoft 365
Pros and Cons of Using Zahara’s Inbuilt Email Service vs. Your Own SMTP
SMTP & Email Sending
T&C on your PO Template
Invoice Processing Help Category
Auto reject supplier invoices
Auto rejecting of invoices issue
Finding an order or invoice
How to create a credit note
Invoice email forwarding – Microsoft 365
Invoice export colours
Invoice Inbox
Invoice List View
Invoice matching
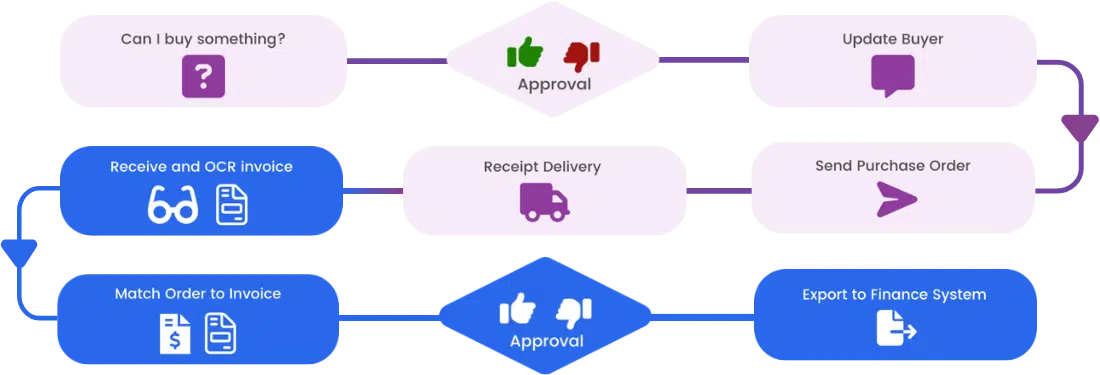
Invoice Processing Explained
Month end cut offs
Negative Order Balance
Setting up Autopilot
Supplier Matching
Waiting for a GRN
Purchase Orders Category
Adding a product to an order
Adding documents to an order
Bulk importing orders
Close Orders Automatically
Closing an order
Copy PO to Buyer
Creating a Purchase Order
Deleting a PO
Duplicate Order Prevention
Editing an order
Finding an order or invoice
GRN an Order – Learn with this Guide
Grouped Purchase Orders
Import Line Items
Negative Order Balance
PO Template Editing
Product Centric Buying
Purchase Order Numbering
Purchase Order PDF
Purchase Order Prefix
Purchase Requisition Number
Quick Create a Purchase Order
Send PO to Supplier
Supplier order acceptance
What is a Purchase Order?
The business menu is where you configure and set up your business. The settings here are unique to the Business.
The admin menu is for creating new businesses (business units) and for managing your users. These settings sit across all businesses.
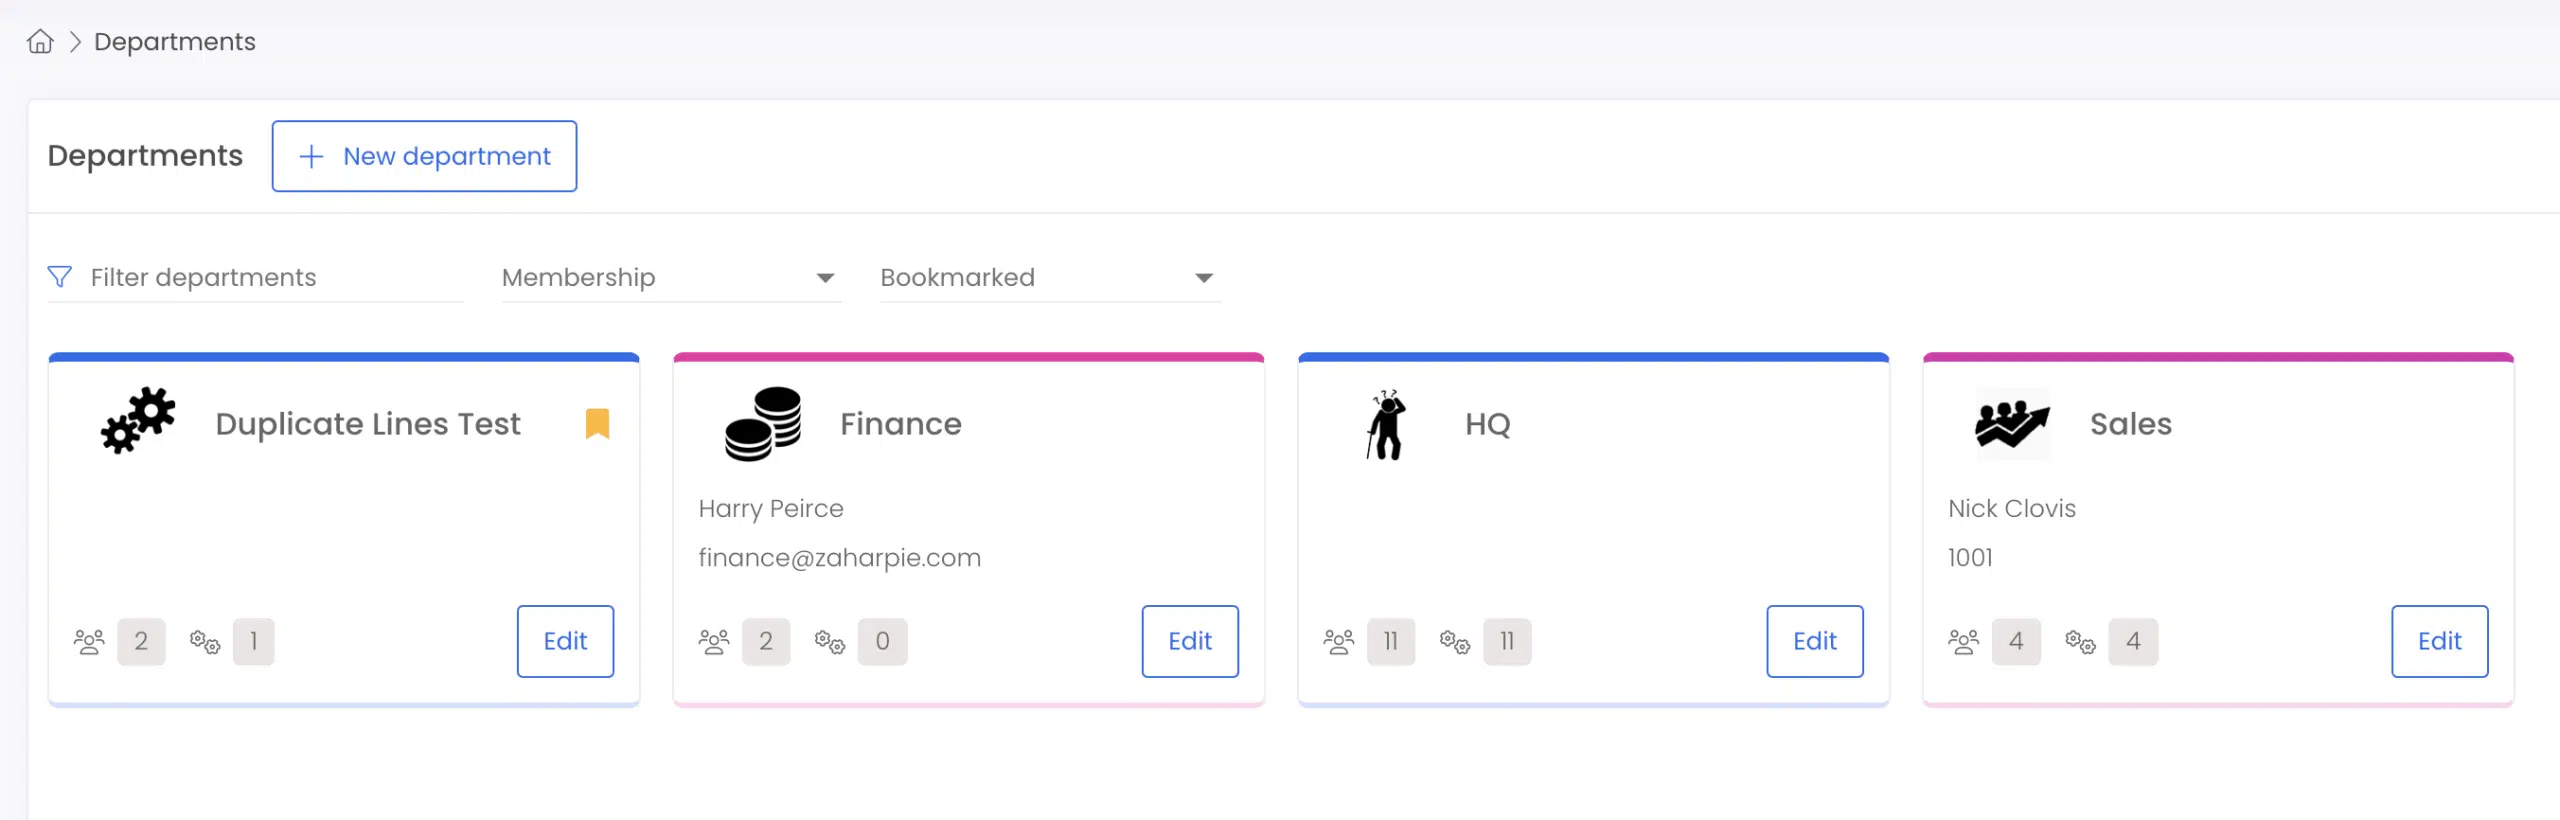
Your first real decision is on the structure of your business. Divisions are the natural groupings of people inside the organization and are used mainly for approvals and budgets. If you are using Zahara for approvals of purchases (pre-spend) or invoices (supplier/vendor) then these approvals will be created in the divisions.
Therefore, step 1 is to create your divisions. ie Marketing / HR / London Central Office – call them what you want, but the next step soon will be to assign users to them.
You can create multiple business units, but this creates more admin overhead. There is more to manage. As a rule of thumb, create the same number of business units in Zahara that you have as companies in your accounts / ERP system. Business units are ring-fenced areas and you have to switch between them.
To understand more about the structure, have a read of the planning guide.>
Now you have your divisions created, we recommend you add your users to them. Once a user is added you can manage their membership and roles in each Division.
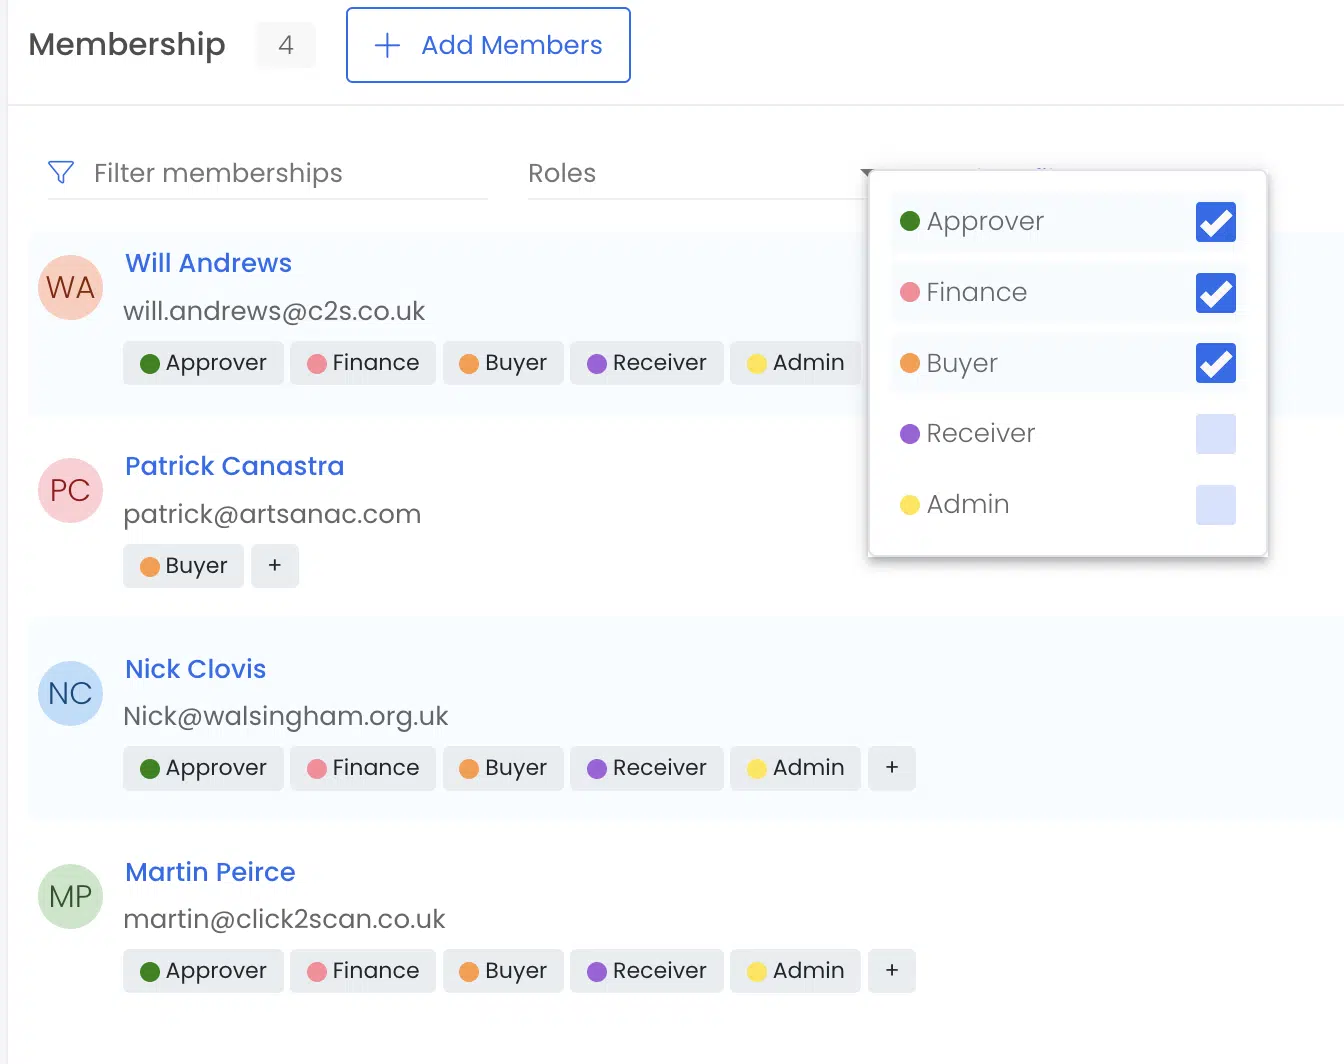
However, to add the users into Zahara, you need to click over to the Admin menu and then settings. From here use the Wizard to create your users. Once created their membership can be managed in the Division. There is a lot to learn around permissions and roles but to start with, at least get the users assigned to the divisions.
Read the help article on users to understand how to add and configure users.
Before you go further, just take a minute to refine some settings in Business Settings.
Familiarise yourself with the different tabs.
Integration
If you use one of the fully integrated systems like Xero, QBO or MYOB, you can connect up under the integrations tab of business settings. Allow time for the sync to complete. You should start to see suppliers and coding appearing in the lists if you click out of Business Settings.
Sage 50
If you are a UK Sage 50 user, then select “Sage 50″ from the Integration Tab you will be able to download our Sage 50 on-premise sync tool and connect to Sage 50 as well. Choose the correct version of Sage – ie 2021 – Read the article on setting up SmartSync to familiarise yourself with the process and the re-requisites.
If you have managed an accounts system sync, then you should by now have some suppliers and coding. If not, you can head into each of these in the business menu and either type them in manually or more than likely import them. For each, we have a template that you can download under the import button.
Suppliers – there are two fields we need – default currency and country code. Make sure you use the correct ISO country code like “GB” or “US” and make sure you read the importing help article on this.
At this point, you should have divisions created and have assigned users to the divisions. Now you can edit each division and create a workflow. First though, set your division head as you may want to use that as a variable when copying workflows over.
You can pretty much achieve anything with our approvals but remember the key principles:
Please read our help article “Understanding workflows & Approvals” as it covers all approval and workflow functionality.
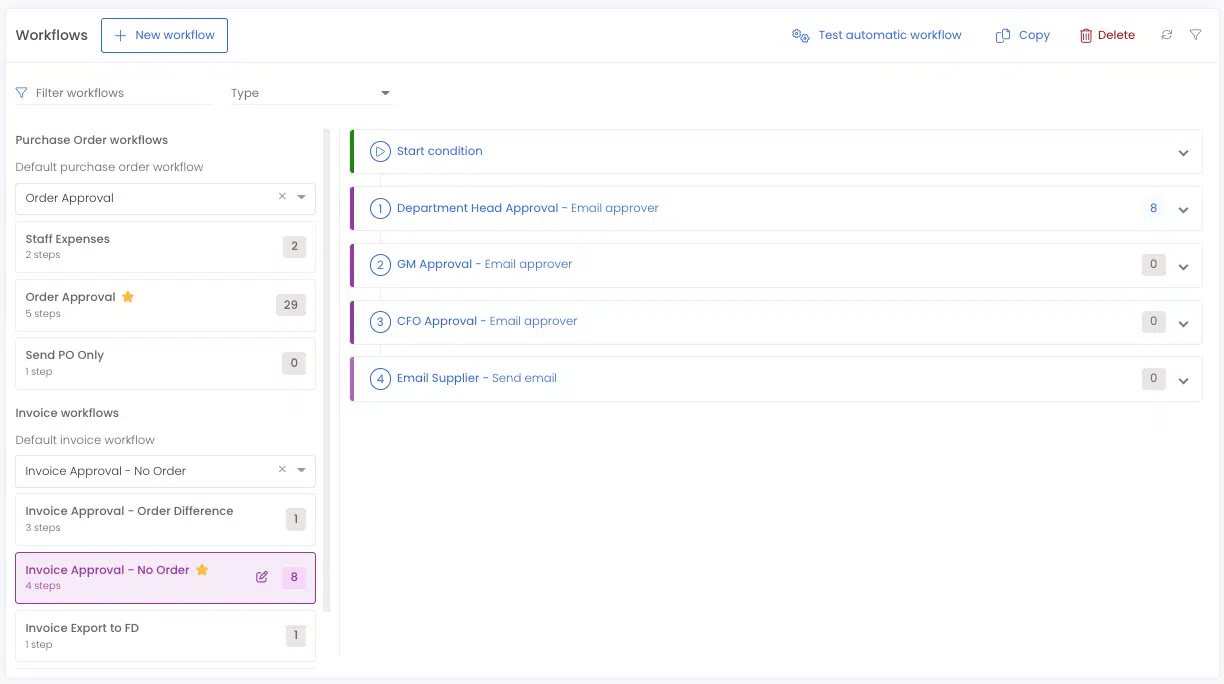

Set your default workflows. Typically, you will have one workflow for an invoice and one for an order – possibly more. If you have multiple workflows with conditional starts, set the default workflow as “Automatic” or “Automatic Invoice” and Zahara will choose which workflow to use on a case by case basis. Otherwise set the default – per division – as your created workflow.
If you plan to just use Zahara for invoice processing you can skip this step. Otherwise, click the + icon and select ‘New Order’. The first main decision is the division. Make sure you select the one that you have just created a workflow for. Next, choose the supplier. If you have entered/synced or imported your suppliers, search or select one from the list. Now you can populate your line items. Make something up! Notice the drop-down lists.
You can control the formatting of those in Business Settings > Formatting and you can control which ones have to be populated in the validations tab.
On the next screen, you may see a blank budget screen – this can be turned off or you can set up budgets – see the help article on that. You can set this in Business Settings > Budgets.
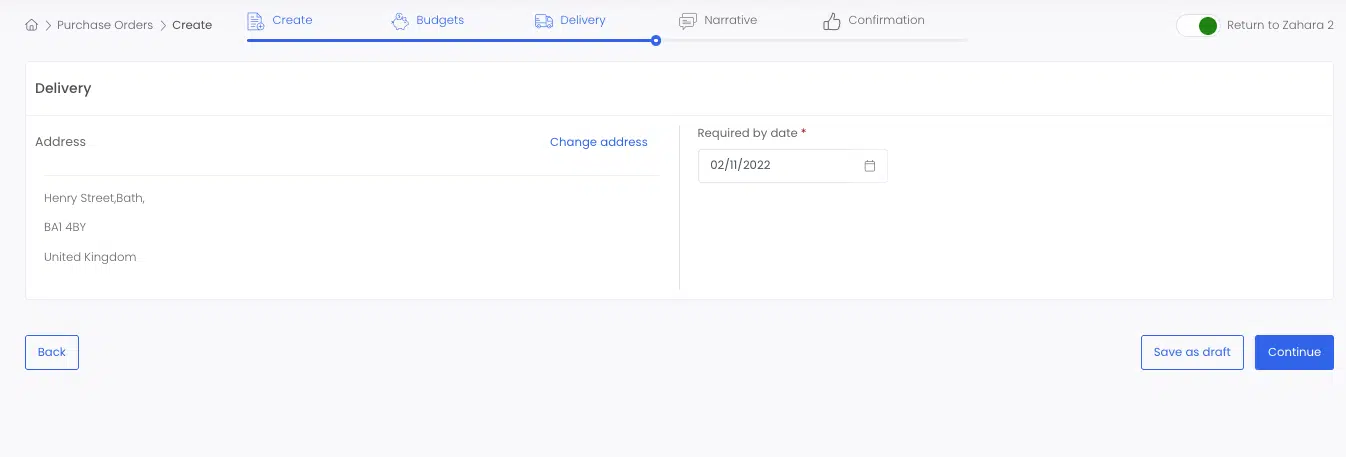
On the delivery address screen, you should see the default delivery address – this can be set to division or project. You can set this in Business Settings > Purchase Orders.
Notice the workflow drop-downmon the next screen?
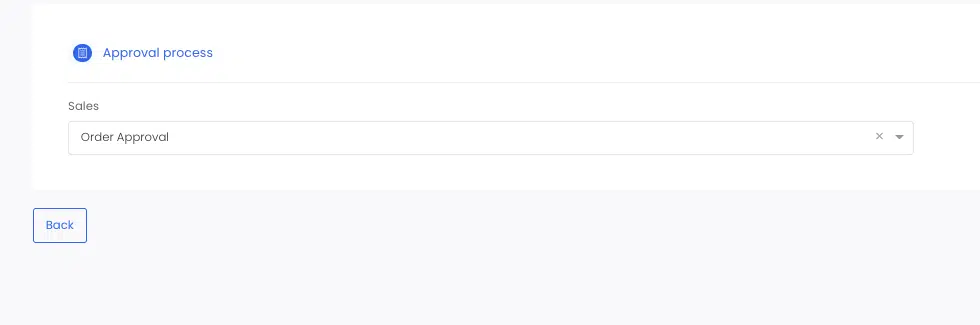
As the tenancy admin, you should be able to choose a workflow Your users typically won’t be able to once you take away the admin role from their permissions. This should be set to the default you set in the division settings. Next, you can click through and add some comments. Then you can preview your order and click ‘create’.
If all has gone to plan you will see your order in the list and it should be orange – out for approval. If you have created a workflow where you are the approver, you will now receive an email or will see the approval in your dashboard.
GRN’ing (goods receipting) an order is very simple. Tick it in the purchase orders list and then click GRN. Now follow the steps on the screen. You can GRN the same order over and over – negative and positive quantities. Ultimately you are trying to get to a zero balance on each line and a grey truck icon.

At the end of the process, once the invoice is approved or you are happy, you will want to export the invoice to your account system. This could be as simple as producing an Excel spreadsheet that you use to import into your accounts system, or it could be like Xero & QuickBooks Online where the invoice and the PDF will now pass into the accounts system, fully coded and linked back to Zahara.
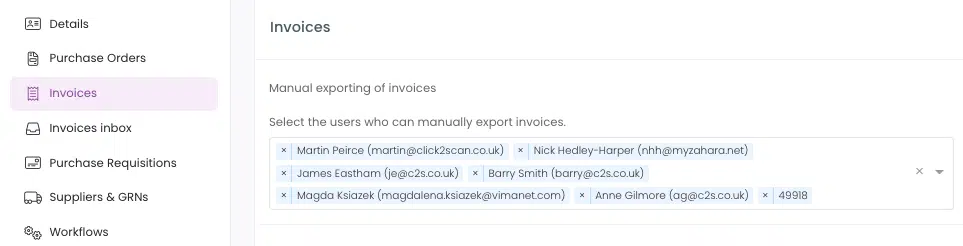
Firstly, if you have enabled it, you can do this manually and set the users that can export invoices in Business Settings > Invoices.
Now you will see the ‘Export’ button in the invoices list view. Tick your invoices and select export. Based on the integration you set in the Business Settings > Integrations tab, the chosen method will be invoked.
Export Automatically – For Sage 50 Sync, Xero, MYOB and QuickBooks Online users, you can add a workflow step to “Export” the invoice. Provided this step is after an approval, you can find your invoices proceeding into the accounts system automatically.
Now you have got the basics of Zahara you can spend more time on the different settings around workflows and can refine things like the Purchase Order Template and the wording of the individual emails.
Other considerations will be setting up budgets and projects. Typically, our customers build a prototype and then show their colleagues before training and going live. The help articles here are designed to provide you with all the information – both background and detail – to set Zahara up the way you want it.
