Business Unit Category
Add an email signature
Coding Restrictions
Create new Business Unit
Custom Fields on Line Items
Customised labels
Date formating
Default delivery address
Division Management
Editing Email Templates
How to hide cost codes
Invoice email forwarding – Microsoft 365
Pros and Cons of Using Zahara’s Inbuilt Email Service vs. Your Own SMTP
SMTP & Email Sending
T&C on your PO Template
Invoice Processing Help Category
Auto reject supplier invoices
Auto rejecting of invoices issue
Finding an order or invoice
How to create a credit note
Invoice email forwarding – Microsoft 365
Invoice export colours
Invoice Inbox
Invoice List View
Invoice matching
Invoice Processing Explained
Month end cut offs
Negative Order Balance
Setting up Autopilot
Supplier Matching
Waiting for a GRN
Purchase Orders Category
Adding a product to an order
Adding documents to an order
Bulk importing orders
Close Orders Automatically
Closing an order
Copy PO to Buyer
Creating a Purchase Order
Deleting a PO
Duplicate Order Prevention
Editing an order
Finding an order or invoice
GRN an Order – Learn with this Guide
Grouped Purchase Orders
Import Line Items
Negative Order Balance
PO Template Editing
Product Centric Buying
Purchase Order Numbering
Purchase Order PDF
Purchase Order Prefix
Purchase Requisition Number
Quick Create a Purchase Order
Send PO to Supplier
Supplier order acceptance
What is a Purchase Order?
The custom export integration type allows you to customise and produce uniquely structured downloads of your invoice data as either a CSV or Excel document.
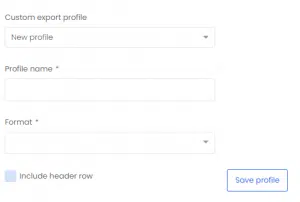
To begin, you will need to name your profile and set the export format, with the options being CSV or Excel. You can then decide if you want to label your column headings, which can be set in the profile builder.
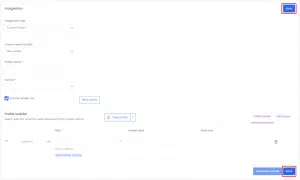
The profile builder – Here you can select, edit and order the fields required for the custom export.
Start by adding as many columns as required. For each column select the field which will provide the value from the Zahara database. If you need help understanding what some of the field options are, the ‘Field types’ tab describes each of the different fields available.
You can also select to use a ‘Custom text’ field. This will provide you with a fixed text field, allowing you to specify the value for this column.
‘Empty column’ is also an option. This will give you the ability to offer a blank field.
For each column, you can add conditions on the field option. Each field option can have a set of conditions which if the value (condition) is met will replace the database value with an outcome value chosen by you.

When you are happy with how you have set your profile up, you will need to click the ‘Save profile’ button for the changes to save. You can sample your profile against the 10 most recent invoices to make sure it is set up appropriately via the ‘Download sample’ button.
If you want to apply the profile, view the ‘Applying the profile’ section below.
To make changes to an existing profile select it from the ‘Custom export profile’ field. Make any changes as necessary and click the ‘Save profile’ button when you’re finished.
If you want to apply a profile, you will need the desired profile selected in the ‘Custom export profile’ field and then click either of the two ‘Save’ buttons.
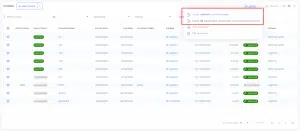
Once applied a profile can be used to export invoices from the invoices screen.
From the invoices screen, you can click on the ‘Export’ button. A drop-down will appear and present the following options:
Selecting either of the two options will download the relevant invoices in your specific format according to your custom export profile.
Once you have your profile set up exactly as required, you are able to copy that profile to one or more business units in your tenancy.
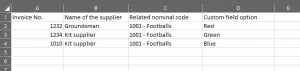
This is how I have my custom export profile set up.


This is how my CSV file will look after clicking the ‘Export’ button on the invoices list view.