Business Unit Category
Add an email signature
Coding Restrictions
Create new Business Unit
Custom Fields on Line Items
Customised labels
Date formating
Default delivery address
Division Management
Editing Email Templates
How to hide cost codes
Invoice email forwarding – Microsoft 365
Pros and Cons of Using Zahara’s Inbuilt Email Service vs. Your Own SMTP
SMTP & Email Sending
T&C on your PO Template
Invoice Processing Help Category
Auto reject supplier invoices
Auto rejecting of invoices issue
Finding an order or invoice
How to create a credit note
Invoice email forwarding – Microsoft 365
Invoice export colours
Invoice Inbox
Invoice List View
Invoice matching
Invoice Processing Explained
Month end cut offs
Negative Order Balance
Setting up Autopilot
Supplier Matching
Waiting for a GRN
Purchase Orders Category
Adding a product to an order
Adding documents to an order
Bulk importing orders
Close Orders Automatically
Closing an order
Copy PO to Buyer
Creating a Purchase Order
Deleting a PO
Duplicate Order Prevention
Editing an order
Finding an order or invoice
GRN an Order – Learn with this Guide
Grouped Purchase Orders
Import Line Items
Negative Order Balance
PO Template Editing
Product Centric Buying
Purchase Order Numbering
Purchase Order PDF
Purchase Order Prefix
Purchase Requisition Number
Quick Create a Purchase Order
Send PO to Supplier
Supplier order acceptance
What is a Purchase Order?
The invoice list view is accessed from the Documents menu. From here you can:
Whereas the Invoice Inbox is focused on processing invoices, this screen is the list of created and already processed invoices
You can create a new invoice by clicking the “New Invoice” button or clicking “Create” at the top of the page, and Invoice.
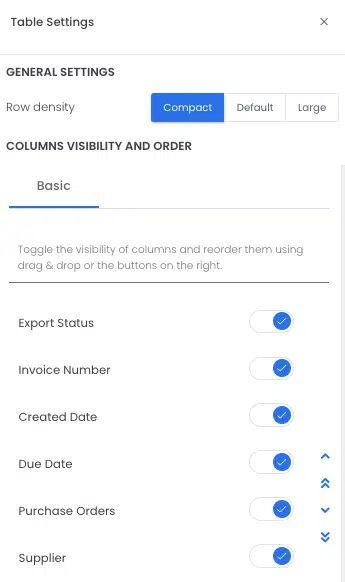
To change row density or customise columns click the ‘Edit table settings’ button to open the table settings side panel.

Row density can be set to ‘compact’, ‘default’ or ‘large’ using the buttons under the general settings heading.
The columns visible and the order of them will be set to the Zahara default initially. If these don’t fit your specific requirements you can change them on a per user basis. You can select or deselect from a range of possible options including all the “basic” columns and any “custom” columns your business may have.
Switch between basic and custom columns by clicking the tabs. Each column will have a switch to toggle it’s visibility. It is also possible to re-order them from left to right, however, custom columns will always come after your selected basic columns.You can also re-order them (top -> bottom will read left -> right). To do this either select the column and use the arrows on the right or you can drag and drop columns into their new position.
There are a variety of ways in which you can filter the invoices in the list view to the ones you’re more specifically interested in.
The filter and search section can be toggled in and out of view using the ‘filter’ button on the far right of the toolbar. Within this section you have three filters available to you.
These filters are not mutually exclusive. You can use any combination to target a more specific range of invoices. For example you could choose to view only invoices that have been ‘approved’ but ‘not exported’ that were created ‘this month’.You also have the option to search for specific invoices using the free text search field.
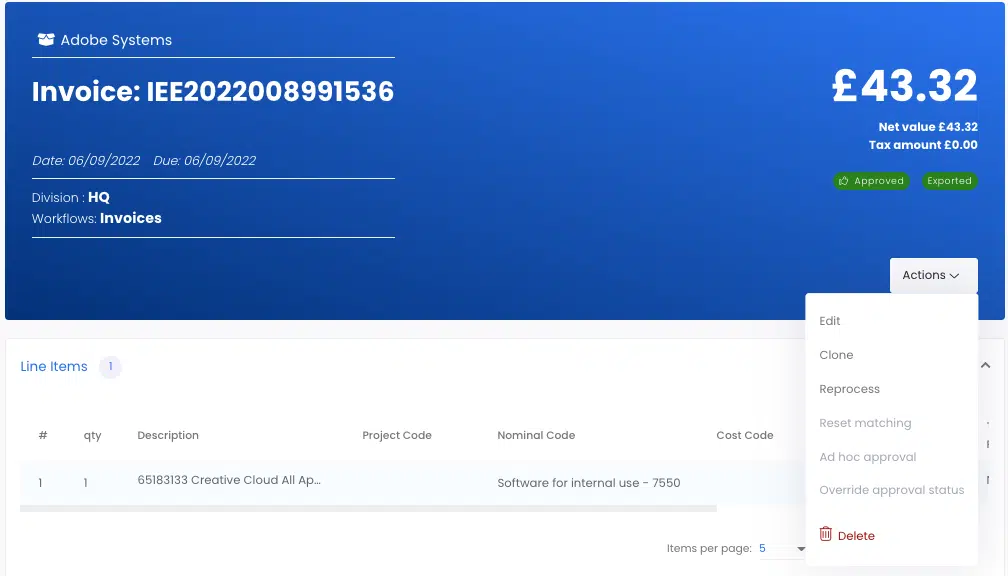
From the invoices list you can open any of the invoices by clicking on the Invoice Number. From there you will have access to the full range of actions for an invoice using the Document Actions menu.
Similarly to viewing invoices, you can also view any of the purchase orders associated to an invoice. To open a purchase order, click the desired purchase order number in the ‘purchase order number’ column.
If you wish to view the specific details of an invoice’s supplier you can click the supplier’s name for that invoice. This will open the ‘view suppliers’ screen.
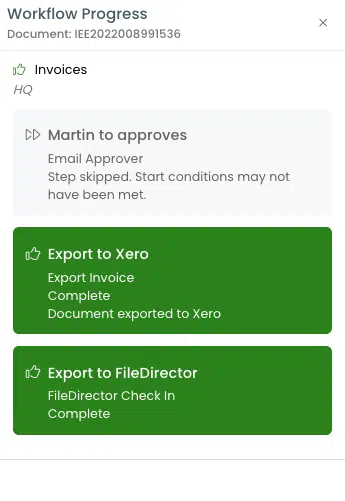
Clicking on the approval status of an invoice will open the ‘workflow progress’ sidebar. Here you will be able to see in more detail all of the workflows and their steps associated to that invoice.
Each workflow shows the steps involved and their status. You will also be able to see the approver(s) if the step requires user approval in the top right. Hover of the initials of an approver to reveal their full name in a tooltip.
Skipped steps will show as grey, whereas active steps will show with colour.
Those with the correct permissions can batch change invoices. Select or multiple select invoices and then click the update button:
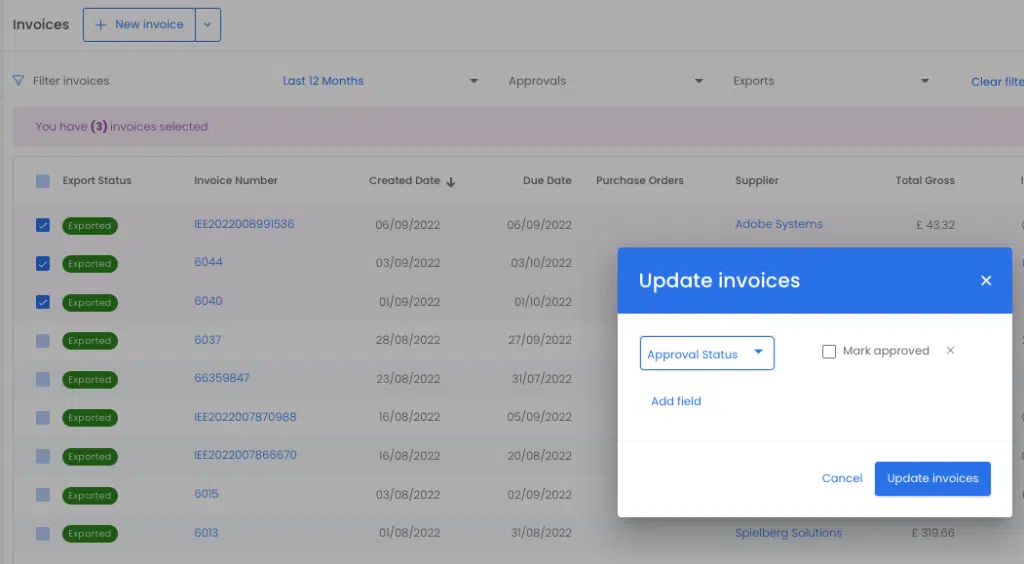
The options available are:
The ‘Export’ button in the toolbar will export all selected invoices using your designated integration export type. (Your export type can be found by visiting Business Settings and clicking into the Integration tab.)
If you are exporting to a local file it will be downloaded by your browser.
If you export to Xero, QuickBooks Online, MYOB or SmartSync then we will get feedback from the accounts system if the invoice was received and posted correctly. The ‘export status’ for each exported invoice will be updated accordingly based on the response.
The export button has a drop down and if clicked you can choose an option:
The CSV export will provide you with all of the field values currently on display in the list view.
The PDF export will package up the PDF of the invoice, together with the history.
To delete an invoice, find it in the usual way. Edit the invoice. From the document actions menu, select Delete. This button will only be active if the user has invoice delete permissions.