


Business Unit Category
Add an email signature
Coding Restrictions
Create new Business Unit
Custom Fields on Line Items
Customised labels
Date formating
Default delivery address
Division Management
Editing Email Templates
How to hide cost codes
Invoice email forwarding – Microsoft 365
Pros and Cons of Using Zahara’s Inbuilt Email Service vs. Your Own SMTP
SMTP & Email Sending
T&C on your PO Template
Invoice Processing Help Category
Auto reject supplier invoices
Auto rejecting of invoices issue
Finding an order or invoice
How to create a credit note
Invoice email forwarding – Microsoft 365
Invoice export colours
Invoice Inbox
Invoice List View
Invoice matching
Invoice Processing Explained
Month end cut offs
Negative Order Balance
Setting up Autopilot
Supplier Matching
Waiting for a GRN
Purchase Orders Category
Adding a product to an order
Adding documents to an order
Bulk importing orders
Close Orders Automatically
Closing an order
Copy PO to Buyer
Creating a Purchase Order
Deleting a PO
Duplicate Order Prevention
Editing an order
Finding an order or invoice
GRN an Order – Learn with this Guide
Grouped Purchase Orders
Import Line Items
Negative Order Balance
PO Template Editing
Product Centric Buying
Purchase Order Numbering
Purchase Order PDF
Purchase Order Prefix
Purchase Requisition Number
Quick Create a Purchase Order
Send PO to Supplier
Supplier order acceptance
What is a Purchase Order?
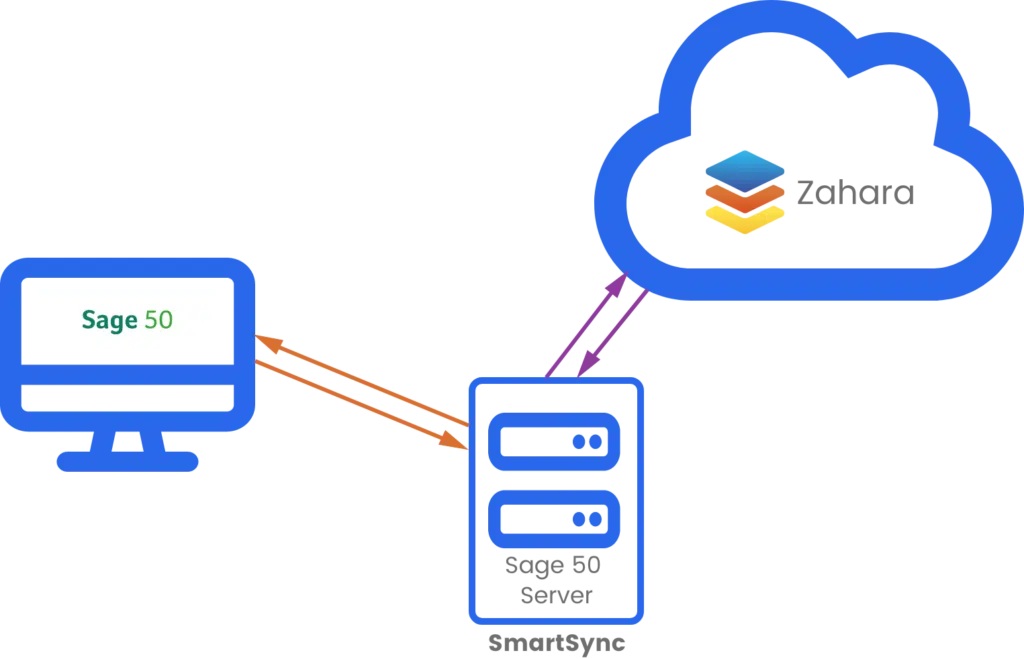
Installation Server
Installation Checks
Assisted Installation
Settings
Sage Drive


Tab 1 – Zahara
|
Option
|
Explanation
|
|
Download invoices raised in Zahara
|
Any invoices manually created in Zahara will be downloaded to the local database and most likely posted into Sage 50 (assuming Sage 50 is being used)
|
|
Upload PDF’s to Zahara
|
Used with SmartInvoice, any invoices processed in SmartInvoice, will have the PDF’s uploaded into Zahara within the Zahara invoice record.
|
|
Enable workflows in Zahara
|
Invoices will respect the default workflows set in Zahara for the Division or invoices will use the pre-set approval workflow set in SmartInvoice
|
|
Force workflows in Zahara
|
If an invoice PDF fails to upload temporarily, the workflow will be attached once the PDF subsequently uploads.
|
Tab 2. Sage
Tab 3 – Database
Tab 4 – Settings
Tab 5 – FileDirector
Tab 6 – Schedule
Tab 7 – Logging
Tab 8 – Run Sync
Tab 9 – Default Tax Code
Tab 10 – Project Status
Tab 11 – Profile Settings
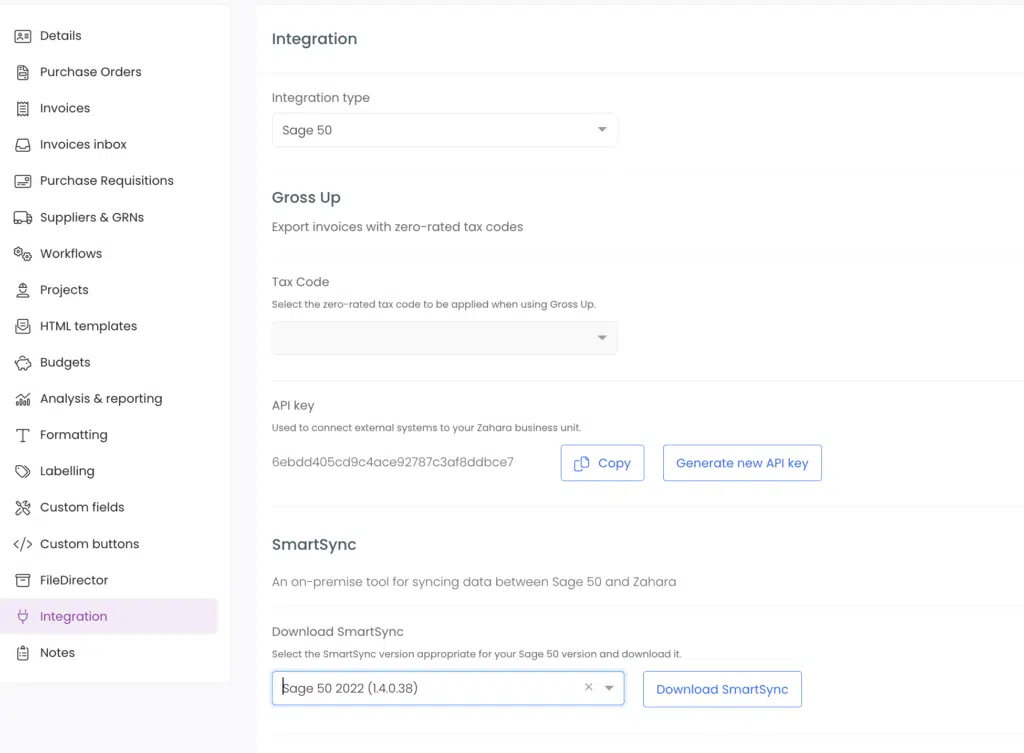
Setting the departments correctly in SmartySync
Posting Invoices
Syncing suppliers with Sage 50
If you have SmartSync installed, you can set up a supplier sync and set how often suppliers are synced. But first, you need to ask yourselves where you want suppliers to be originated? Sage 50 or Zahara.
Zahara is far more flexible because it’s multi-user meaning users with the right permissions can create suppliers. You can also create a Microsoft Flow or Zapier to alert you when a new supplier is created in Zahara allowing you to validate them. But if a supplier is created in Zahara, it will need to end up in Sage 50 as well. The good news is that as from Jan 2019 – 1.4.0.9 and above, if you use the latest version of SmartSync then the supplier can be created in Sage 50 as part of an invoice posting. This would then work as follows:
If you prefer to originate the supplier in Sage 50 then you need to run the supplier sync in SmartSync and set the timing of that based on how many suppliers per day you create. Our advice is to manage your supplier list carefully as this is the number 1 cause of fraud in any business.
Bad suppliers in Sage
As part of the sync, Zahara will bring overall suppliers from Sage 50. If you have disabled suppliers in Sage, we will respect that setting and bring over the disabled suppliers and they will remain disabled in Zahara. But, if you have 3000 suppliers in Sage 50 and only want 300 of them in Zahara, we have a small problem. Zahara can’t tell which are your good ones and which ones are legacy. In that situation, you should do the following:
* If you have already gone live with Zahara then manually select the suppliers you wish to delete. There is a multi-select option in Zahara suppliers to do this as a batch.
|
Problem
|
Resolution
|
|
Invoices are not being posted from Zahara
|
Check that the SmartSync Profile is running. Launch SmartSync and just double check that it says that the profile is running. If it is, stop and start the profile and see if that resolves your issue. You can also restart the SmartSync service in Windows Services, look for the “Click2Scan SmartSync Service”
|
|
Suppliers are not being uploaded to Zahara
|
Check that the SmartSync Profile is running. Launch SmartSync and just double check that it says that the profile is running. If it is, stop and start the profile and see if that resolves your issue. You can also restart the SmartSync service in Windows Services, look for the “Click2Scan SmartSync Service”
|
Still Unsure?
You can get access to Event Viewer by simply search for it in the Windows Search Box in the bottom left-hand corner of your screen or by heading to Windows Icon>Windows Administrative Tools>Event Viewer.
SmartSync’s log is available on the left-hand side under Applications and Services Logs.
There should be a large number of entries highlighting everything SmartSync has done recently. On the right-hand side, you can select “Save All Events As…”
If you provide this file to the support team, they will be able to get a better understanding of the issue without ever needing to access your PC/server.
Service isn’t running
A user account is locked
