


Business Unit Category
Add an email signature
Coding Restrictions
Create new Business Unit
Custom Fields on Line Items
Customised labels
Date formating
Default delivery address
Division Management
Editing Email Templates
How to hide cost codes
Invoice email forwarding – Microsoft 365
Pros and Cons of Using Zahara’s Inbuilt Email Service vs. Your Own SMTP
SMTP & Email Sending
T&C on your PO Template
Invoice Processing Help Category
Auto reject supplier invoices
Auto rejecting of invoices issue
Finding an order or invoice
How to create a credit note
Invoice email forwarding – Microsoft 365
Invoice export colours
Invoice Inbox
Invoice List View
Invoice matching
Invoice Processing Explained
Month end cut offs
Negative Order Balance
Setting up Autopilot
Supplier Matching
Waiting for a GRN
Purchase Orders Category
Adding a product to an order
Adding documents to an order
Bulk importing orders
Close Orders Automatically
Closing an order
Copy PO to Buyer
Creating a Purchase Order
Deleting a PO
Duplicate Order Prevention
Editing an order
Finding an order or invoice
GRN an Order – Learn with this Guide
Grouped Purchase Orders
Import Line Items
Negative Order Balance
PO Template Editing
Product Centric Buying
Purchase Order Numbering
Purchase Order PDF
Purchase Order Prefix
Purchase Requisition Number
Quick Create a Purchase Order
Send PO to Supplier
Supplier order acceptance
What is a Purchase Order?
In Zahara, you can record two types of invoices – standalone and those that relate to a purchase order. There are several different ways of recording an invoice in Zahara and as well as the in-built Invoice Inbox. Once an invoice is recorded, it can be routed for approval either automatically in a rules-based system or in Ad Hoc mode, where you choose the approver. Ultimately, Zahara is designed to export the invoice into your accounts system and there are many options to choose from fully integrated, to just a CSV or Excel spreadsheet.
Invoices should flow into your accounts system very quickly. Users can approve by email and can be reminded daily to do their approvals so there is no reason for big delays as Zahara is a paperless process. However, there will be a point at month-end where you will have invoices in Zahara that haven’t been exported into the accounts system yet. There are a number of ways to report on this. Our reporting section has an Order/Invoice difference report. You can also create invoice reports with the export date, showing those invoices not yet exported. Zahara users work in different ways so there should be something for everyone in Zahara. Ultimately you can use the invoices list view to filter down any invoices that have not yet been exported or approved.
The invoice list view is available from the documents menu – Invoices. The Invoice Inbox is the place to originate invoices emailed into Zahara.
The first filter to work with is the time period you wish to display. This will be remembered and is personal to the user. You can also set this to show different types of invoices. You can search inside the results by using the search bar just above the list view. You can sort the columns and as stated above choose the fields you wish to display. Clicking the approval icon will show you the approval process. Ultimately you want to see green for approved, green for 100% match with order and green for exported.
There are several ways to record an invoice:
Invoice Inbox – Our preferred and suggested way. Generate your own email address and have the invoices emailed into Zahara. With our Built-in OCR, you can have the invoices automatically read, saving any keying in. This is the recommended way of getting invoices into Zahara as the PDF element is handled and most of your suppliers will be emailing you their invoices anyway.
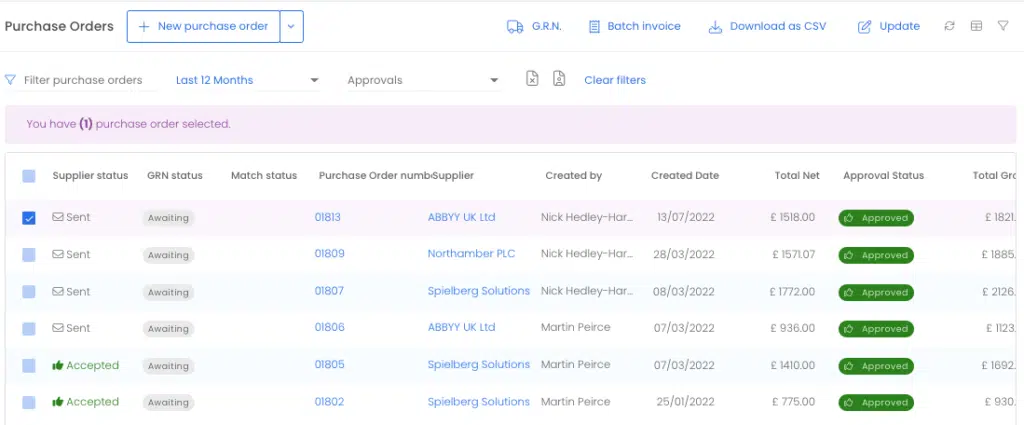
Record against an Order – If you are using purchase orders, you can select an order and record an invoice against it. In the purchases list view, check the order and then click Batch Invoice
From the invoices Page – The invoices list view page also has two icons for recording an invoice. One is a standard invoice the other is for what we call a grouped invoice. The only difference is that with a grouped invoice you can have a different division per line item. If you have read up on structures, you will know divisions are significant.
From the + menu item – You can also record an invoice by simply clicking + and ‘New Invoice’. This is usually the way to record a standalone invoice that perhaps you have scanned or that’s been emailed to you personally. You can either record it standalone or against an order. If you select an order, make sure you import the order lines so it matches.
There are two types of invoice approval – automated and ad hoc. The approvals help article needs to be read and understood to get the most out of approvals. If you get your invoice workflow right, invoices can hit Zahara and your workflow will determine whether the invoice needs to go for approval or whether it can export automatically into your accounts system (SmartSync, Xero & QuickBooks Online).
Make sure you have read up on approvals and workflows by reading this article:
We have a dedicated help article relating to Order & Invoice Matching. However these are the key points to explain.
Please read this accompanying article on invoice matching
One of the really nice features of Zahara is that you can record an order and then record multiple invoices against it. For example, it could be a master PO and you expect 12 invoices over the next year. You can record those invoices and always see the order invoice balance. It’s entirely down to you how you create the master PO – whether it’s 12 separate lines or one master line.
If you want hands-free processing of invoices, then the invoice inbox is for you. There are two elements to this:
Read the accompanying help article on the Zahara Invoice Inbox and find out about AutoPilot
Importing from Xero
If you are a Xero user and you also want to use Dext, Auto Entry or Dochub, you can import your invoices placed in Draft in Xero. Enable the feature in Business Settings Integrations. Read the dedicated article on this to find out more.
Invoice PDF’s
Always record an invoice in Zahara with a PDF. It will be stored in Zahara for at least 7 years. The PDF of the invoice can always be viewed together with the invoice record. The invoice PDF will be copied over to both Xero, MYOB and QuickBooks Online and can also be downloaded onto your network or PC using our Zapier link. For belt & braces PDF storage we would recommend you also consider FileDirector which is our go-to document management system. Invoices can be exported into FileDirector as part of a workflow.
Invoice Notes & History
You can add notes to an invoice at any time. Just click on the invoice and then see the history section at the bottom. Click the + icon to add a note or “Add Document” to upload a supporting document.
Adding a Credit Note
You can add a credit note – this is a negative invoice. Here is a help article specifically on this
Controlling who can export invoices
There are controls on who can export an invoice. You will find this in Business Settings > Invoices. Here is the specific article on this
Finding Invoices
The global search facility in Zahara is a great way to find invoices. You can also use the Invoice list view to filter down on invoices in your results.
Coding Approvals
When an invoice is sent for approval, you can specify – both for Adhoc approvals and rules-based – whether the Approver can or must edit the coding. This can be useful if you receive an invoice and you don’t know how to code it. In this instance, the user cannot simply approve or reject, they have to adjust the coding on the item you specified – ie Project / Job code.
