


Business Unit Category
Add an email signature
Coding Restrictions
Create new Business Unit
Custom Fields on Line Items
Customised labels
Date formating
Default delivery address
Division Management
Editing Email Templates
How to hide cost codes
Invoice email forwarding – Microsoft 365
Pros and Cons of Using Zahara’s Inbuilt Email Service vs. Your Own SMTP
SMTP & Email Sending
T&C on your PO Template
Invoice Processing Help Category
Auto reject supplier invoices
Auto rejecting of invoices issue
Finding an order or invoice
How to create a credit note
Invoice email forwarding – Microsoft 365
Invoice export colours
Invoice Inbox
Invoice List View
Invoice matching
Invoice Processing Explained
Month end cut offs
Negative Order Balance
Setting up Autopilot
Supplier Matching
Waiting for a GRN
Purchase Orders Category
Adding a product to an order
Adding documents to an order
Bulk importing orders
Close Orders Automatically
Closing an order
Copy PO to Buyer
Creating a Purchase Order
Deleting a PO
Duplicate Order Prevention
Editing an order
Finding an order or invoice
GRN an Order – Learn with this Guide
Grouped Purchase Orders
Import Line Items
Negative Order Balance
PO Template Editing
Product Centric Buying
Purchase Order Numbering
Purchase Order PDF
Purchase Order Prefix
Purchase Requisition Number
Quick Create a Purchase Order
Send PO to Supplier
Supplier order acceptance
What is a Purchase Order?
Approval workflows sit at the Division level and Divisions are designed to be flexible, but are really the natural groupings of people in your organisation. If you are a typical business with Marketing, Sales, HR then the Divisions would be perfect for this. If you are a retail chain then perhaps each Division will be a store with the respective users assigned accordingly. So first off, create your Divisions and assign the users. Then set your “Head of Division”. This is useful as it’s a variable in Zahara and can allow you to create the perfect approval process in one Division and then copy it over to other Divisions.
The important takeaways at this early stage of understanding approvals are:
Below are the possible approval workflow steps you can use:
A typical purchase approval is usually layered on the values. As the value of the order or invoice increases, more people are involved in the approval. Here is a typical approval process that we use in our demonstrations:
| Step 1 |
Head of Division |
all |
| Step 2 |
Business Unit Head |
> £1000 |
| Step 3 |
CFO |
> £10000 |
| Step 4 |
CEO |
> £25000 |
| Step 5 |
– |
Send confirmation email |
| Step 6 |
– |
Send PO to supplier |
The above example is a good approval process where you simply use the Net or Gross conditions on the steps- we will create an example of this below. There are also a variety of other conditions available for use- you could apply a condition to the “Send PO to Supplier” to only trigger if a Supplier is a of a certain Supplier Type.
Conditions can be added to each workflow step to only trigger that workflow step when certain factors are true. If you have the above workflow set-up, you may wish to simply skip the previous workflow steps if a document needs approval by the CEO- this is the most important approval step. By using the ‘Net Value’ condition, you can distinguish each step in different ‘brackets’ of amount, so only one approval is sent to the relevant approver, rather than the approval working its way through the approval hierarchy.
You can create these separate tiers by using two Net Value conditions separated by an ‘AND’ link. After adding a condition, the ‘Add Condition’ button will remain available but with an option to add a link.
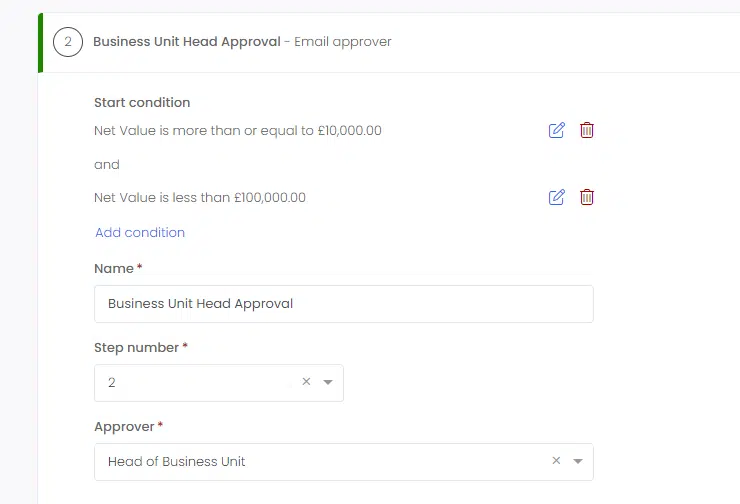
With the above setup, the step would only trigger if the value was between the two. The workflow then goes onto the next step in the process and evaluates whether or not the document fulfills the conditions. You could have a workflow where every step does not pass the check for the condition- this would still be treated as complete.
You may also utilise the ‘OR’ link to separate multiple conditions. While ‘AND’ needs more than one factor to be true, ‘OR’ only needs one factor to be true between two or more conditions. For example, you may wish for a purchase order to go through an extra approval step if the value is either over £1000 OR for the supplier ‘Amazon’. There is no limit to how many conditions you can add to a workflow step- get creative!
You can also set a condition to the overall workflow- the workflow will only be triggered if it meets the condition set. This is designed for use with the ‘Automatic’ Workflow. This function allows you to have multiple workflows for different scenarios, and the best workflow for the document is chosen automatically based on how it fulfills the criteria of the condition. This means that you no longer need to select the best workflow for a document. Select Automatic, and the document will go to the right approvers.
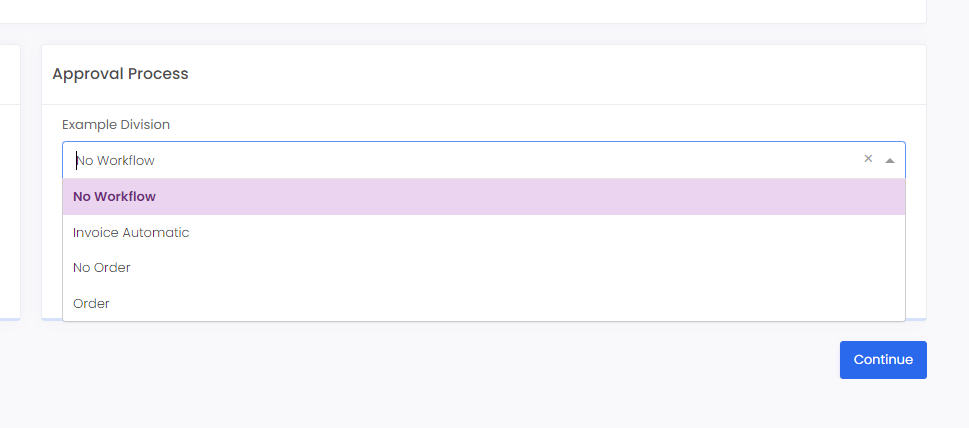
To use this feature, you need to have at least one workflow with a Start Condition. You then need to ensure that, when processed, the document is assigned to the Automatic workflow. This can be made easier by setting the division default to ‘Automatic’, as seen below:
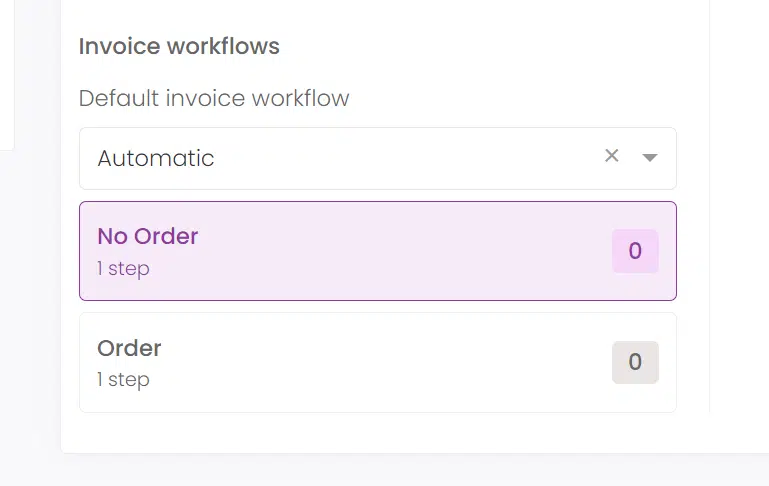
A great example of how this can be effectively utilised is for Invoices. You would likely want an invoice with an associated Purchase Order (an order that already has gone through its own approval process, perhaps) to be processed in a separate workflow to an Invoice without a Purchase Order, which we will now demonstrate below.
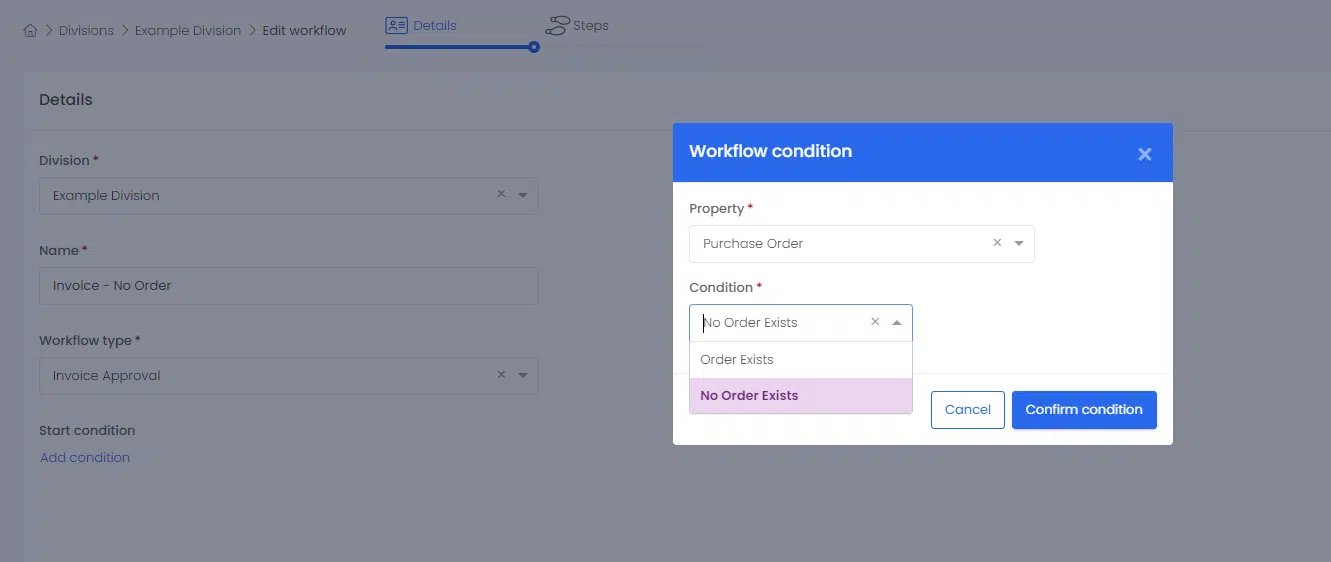
With the “No Order” approval, set the condition to Purchase Order= No Order Exists, as shown above. This is accessed by clicking ‘Add Condition’ on the first screen when creating or editing a workflow. If you have one workflow with the ‘No Order Exists’ condition, and create another workflow with the ‘Order Exists’ workflow, an invoice will be able to go down a separate workflow based on whether it has a Purchase Order automatically.
The same principle applies to any other Start Condition variation, such as different approvals based on Supplier Type- you want to make sure that any potential invoice is covered by the conditions in your workflows when using Automatic workflows with Start Conditions. If you run into ‘No Workflow’ issues, this is likely the cause.
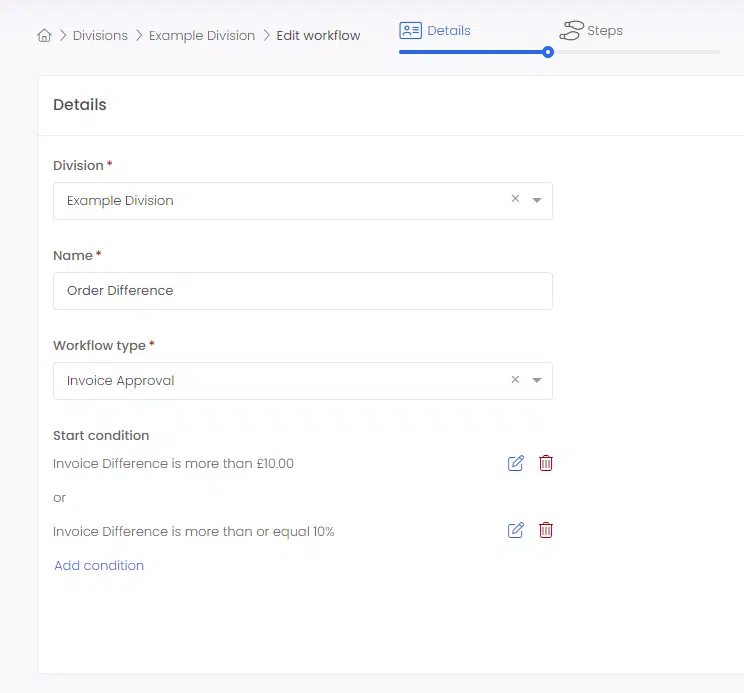
In the above example, the approval will only trigger if the Order invoice difference is Greater than £10 or more than 10% of the order value. When creating a Start Condition for Purchase Order difference, note that selecting ‘more than/less than’ allows you to input a flat amount, and ‘more than or equal to/less than or equal to’ allows for a percentage difference.
This difference approval can mean that all invoices that match the order (or within a small margin) can be approved straight away. This step, followed by a export step, allows you to fully automate the full process if an invoice is matched to an approved order.
The approvals above are rules based. A new invoice lands in Zahara, it is evaluated for an approval process (based on its Division and any approvals set) and the choice of approval or approver is pre-set as the rules and logic kick in. This is the road to automation. You need to think of the rules you need now and possibly in the future if you are to work towards hands-free processing.
There comes a time though when you need to take over. The rules have worked but you need someone to take a look at an invoice as well. Make sure Ad Hoc invoice approvals are enabled in your business settings. (Business Settings > Workflows) – You can then select approvers from a list and choose the outcome of the approval.
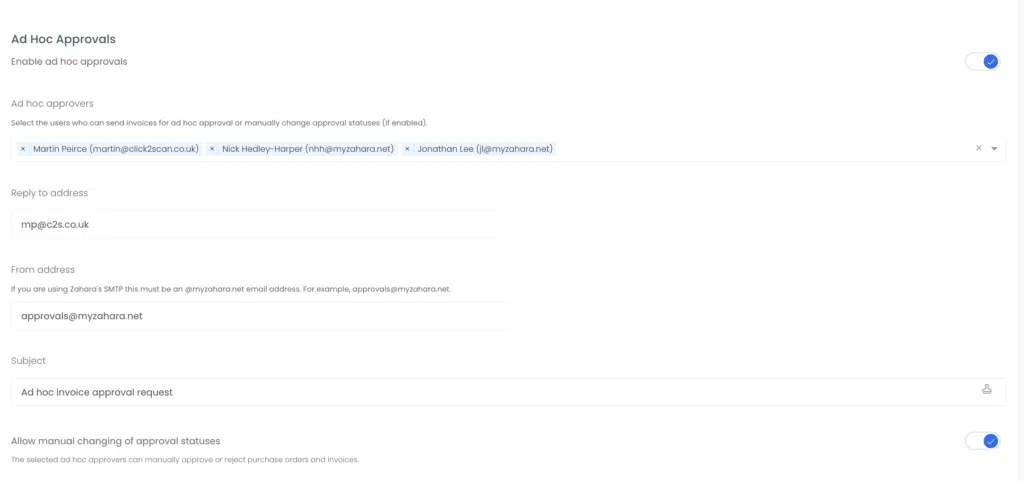
Multiple select your finance users from the list that can use this feature and send invoices out for approval. Set the “Reply To” address – perhaps this will be the email address for the finance team or a particular user in finance. Set the from address, as per your SMTP settings – so if you use Zahara’s SMTP make sure this is an @myzahara.net email address.
Then set the subject for your Ad Hoc invoice approvals – Save your settings
You can only send an invoice out for an Ad Hoc approval when it isn’t currently in a workflow or it has completed a workflow. This means you are looking for a Grey – “no workflow” icon or Green – “Approved” icon. Additionally, you cannot use Ad Hoc approvals for Multi-grouped invoices.
Click into an invoice to view it. Click the Actions menu. Click the Adhoc Approval link:
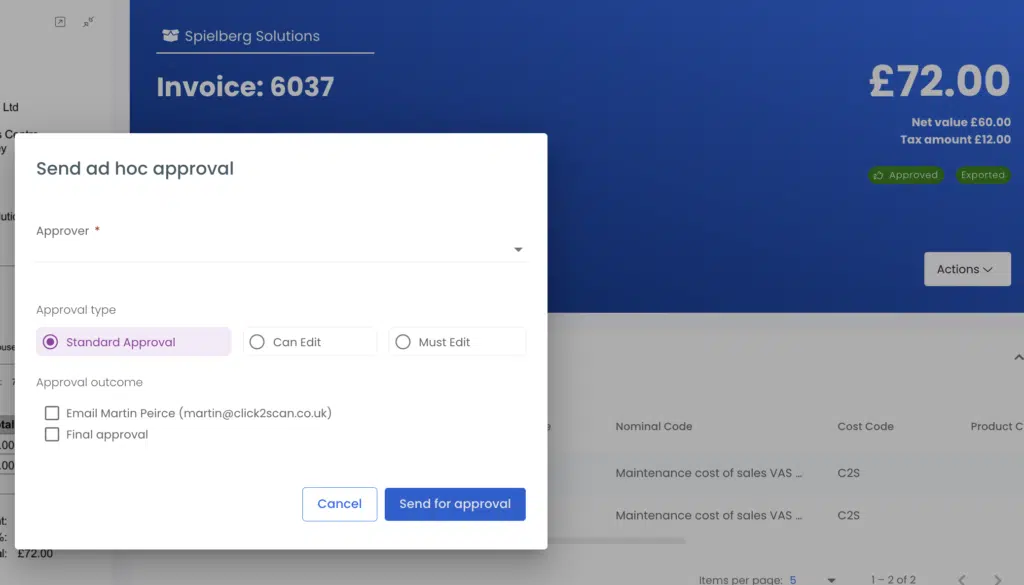
Final Approval – If you send an invoice to Tony for approval and he approves it- is that the end of it or are you wanting to send it on to other people afterwards? Perhaps there are multiple lines to approve. “Final Approval” means that if Tony approves it, and you set it as this, then you will see the Green approve icon. If however, you don’t tick this, you will see a flashing orange icon. The flashing icon means its been actioned so you now need to look at it.
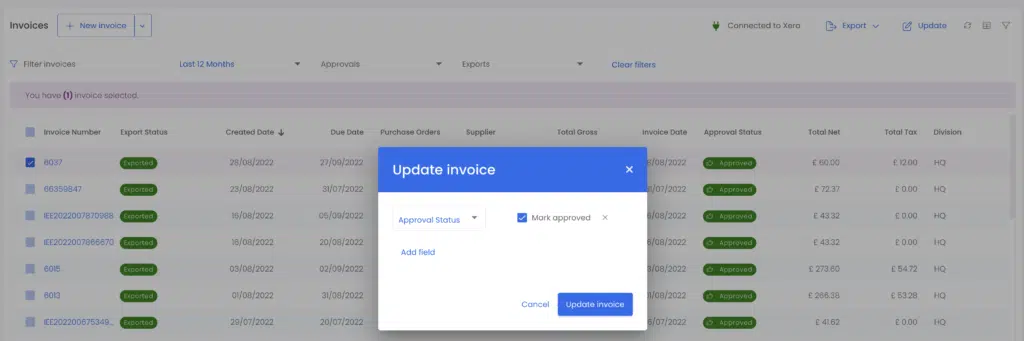
If you have an invoice that is marked as Failed, you are able to manually update this to Approved- this is particularly useful if the Failed message is not relevant to the approval of the invoice. Note that only users with the Admin permission are able to do so.
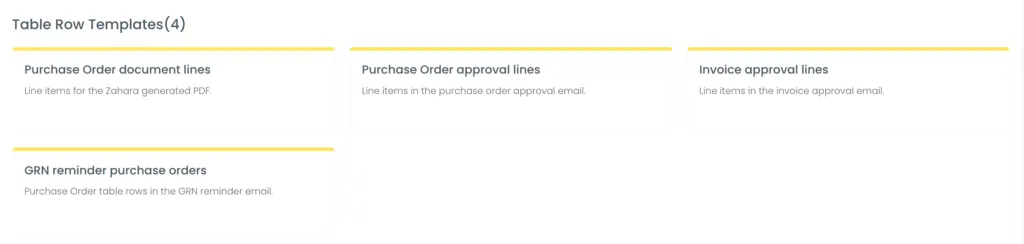
The wording of your Emails including the approval email is edited in the Approval template as shown below. You access this under the Business Settings and the HTML templates section as shown below.

You can change the wording and drop in any placeholders you need from the Insert menu.
The Approve and Reject buttons are preset and styled to work with both Outlook and the rest of the mail systems like Gmail / Office 365 that support later versions of HTML and CSS. You can also display line items inside the email – to show the approver the breakdown of the order or invoice.
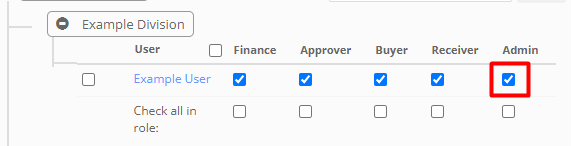
By default, the user wouldn’t usually choose a workflow. We recommend they have the approval process pre-set for them. However, by providing them with the Admin role, the approval list will be accessible. If you want the users to be able to choose a workflow from the drop-down list, they have to have the Admin role. This is set in Admin Settings. On the right panel, expand the Divisions and see the roles the user can have.
So to get to this…
The user needs to have this …
With approval workflows you usually want somebody to take ownership and to take action. Group Approvals are for those who have a team of people where anyone in the team can approve. Perhaps it’s a project team or a flat authority. You can create a workflow step where you select “Group Approval”. This means you can send an approval to a group of people and choose how to allocate it in the group.
The options are:
For the Round Robin & Dynamic options, you must also select a “Time Out” in hours – this means that if the approver hasn’t taken action in the allotted amount of hours then it will go onto the next person in the group until approved. Do not leave as 0 as this will cause endless approval emails to be generated.
There are handlers in the Group approval for things like everybody being off and anything to avoid a perpetual loop. In one of these circumstances, we will fail the approval and leave you with a warning so you can take action.
